Recently, I was working with my colleague Marcin (an engineer from Weaviate core) on a really cool demo project. The idea was to build an image-search application for dogs, which allows a user to provide a picture of a dog, and the app would respond with the most similar breed. And if a user provides a picture of their partner (I might've tested this on my boyfriend 😄), it returns the breed most similar to them.
Once we had the demo up and running, I thought this was a perfect opportunity to share it. This blog post is the foundation for you to build another application around image recognition or product search.
This blog post will guide you to build a full-stack web application in Python with Weaviate and Flask. By the time you are done with the post, you will have built an image-search app! The application will take an image of a dog and return an image from the database that best matches the type of dog in an instant.
You are probably already aware that Weaviate can power 🚀 fast vector searches with documents. What you might not be aware of is that it can also power vectorization and searching through other data types, whether it be audio, images, or others.
This blog post assumes you are familiar with vector search, as well as with spinning up an instance of Weaviate using Docker. If not, that's okay - these guides will help you!
Check out this article to learn more about why vector databases are so fast and how they work.
We will provide code snippets in this post, but you can check out the full code base in the Weaviate Examples GitHub repo under the nearest-neighbor-dog-search directory. We encourage you to follow along with us by cloning the repository!
This blog post covers:
Image Vectorization
In this demo, we will search through a dataset of dog images. The current dataset has ten images of different dog breeds; however, you have the flexibility to change the dataset. Although I use dog pictures for the app, you can easily substitute the dog pictures for any images to make this your own use case 🤔.
Note, make sure you add the new images to the flask-app/static/img folder and run the images-to-base64.py and upload-data-objects.py file.
For a use case like ours, where we would like to identify similar types of dogs, the vectorization must work in a way that captures the information about the dog (breed, size, color, etc.).
The img2vec-neural module in Weaviate is designed to solve this exact problem! The module vectorizes each image to something that represents its contents, so that we can search images based on their semantic similarity. In other words, we can use img2vec-neural to query our database to see how similar the dogs are based on the image.
Img2vec-neural Module
Weaviate's img2vec-neural module is a flexible vectorizer that enables conversion of images to meaningful vectors. ResNet-50 is the first model that is supported on Weaviate. ResNet-50 is a Convolutional Neural Network (CNN) that was trained on the ImageNet database. The model was trained on more than 10 million images and 20,000 classes.
Weaviate Database
Setup
The demo contains a docker-compose.yml file, which defines all the Weaviate modules required to run this demo. In this file, you will see the module, which in our case is img2vec-neural trained on the ResNet-50 model. To spin up your Weaviate instance, navigate to the nearest-neighbor-dog-search directory from the cloned git repository, and run;
docker compose up -d
Once Weaviate is up, check that it is running with:
python weaviate-test.py
You should see something like this, and we are ready to go!
{"classes": []}
Schema Configuration
The dataset we're using contains ten dogs, each containing the following properties: breed, image, weight, and filepath. The schema defines a structure into which we will store data in our Weaviate database, where each object type is referred to as a class.
This includes the class name, which in our case is "Dog" and the properties, such as breed, image, and filepath. In this case, we also need to add in the vectorizer definition, which is the img2vec-neural module, so that Weaviate knows to use that specific vectorizer.
We will tell Weaviate that breed and filepath values are strings, weight is stored as an integer, and images are stored as a blob dataType. Putting it all together, the schema definition should look like the following;
schema = {
   "classes": [
       {
           "class": "Dog",
           "description": "Images of different dogs",
           "moduleConfig": {
               "img2vec-neural": {
                   "imageFields": [
                       "image"
                   ]
               }
           },
           "vectorIndexType": "hnsw",
           "vectorizer": "img2vec-neural", # the img2vec-neural Weaviate vectorizer
           "properties": [
               {
                   "name": "breed",
                   "dataType": ["string"],
                   "description": "name of dog breed",
               },
               {
                   "name": "image",
                   "dataType": ["blob"],
                   "description": "image",
               },
               {
                   "name": "filepath",
                   "dataType":["string"],
                   "description": "filepath of the images",
               }
           ]
       }
   ]
}
Once you've defined the schema, it is then added to Weaviate.
client.schema.create(schema)
Run the create-schema.py to add the schema to your Weaviate instance;
python create-schema.py
Images to Base64
We are almost ready to populate our Weaviate database full of cute dogs! We first need to encode the images to base64 values. Encoding the images to base64 is a requirement for using the blob dataType, which we defined in the schema.
The ten images in the dataset are stored in the flask-app/static/img folder. To convert the images to base64 run:
python images-to-base64.py
Note, the base64 images are stored in the base64_images folder.
Upload the Data Objects
Now that we have defined the schema and converted the images to base64 values, we can upload the data objects to Weaviate.
When uploading your data objects to Weaviate, you want to import your data in batches. The import speed is faster than uploading the objects one by one. Let's configure the batch process to upload in batches of 100, just in case we add more images.
def set_up_batch():
   client.batch.configure(
       batch_size=100,
       dynamic=True,
       timeout_retries=3,
       callback=None,
   )
We will need to define the data properties that we want to upload. The function below will:
- Grab the images in the
base64_imagesfolder. - Remove the file extension to hold just the breed name.
- Set the property values, as defined in the schema.
- Upload new data objects to Weaviate
def import_data():

    client.batch.configure(batch_size=100)  # Configure batch
    with client.batch as batch:
        # Iterate over all .b64 files in the base64_images folder
        for encoded_file_path in os.listdir("./base64_images"):
            with open("./base64_images/" + encoded_file_path) as file:
                file_lines = file.readlines()

                base64_encoding = " ".join(file_lines)
                base64_encoding = base64_encoding.replace("\n", "").replace(" ", "")

                # remove .b64 to get the original file name
                image_file = encoded_file_path.replace(".b64", "")

                # remove image file extension and swap - for " " to get the breed name
                breed = re.sub(".(jpg|jpeg|png)", "", image_file).replace("-", " ")

                # The properties from our schema
                data_properties = {
                    "breed": breed,
                    "image": base64_encoding,
                    "filepath": image_file,
                }

                batch.add_data_object(data_properties, "Dog")
Now we will connect to the local host and upload the data objects.
client = weaviate.Client("http://localhost:8080")
set_up_batch()
clear_up_dogs()
import_data()
Run this file with;
python upload-data-objects.py
And just like that, you have populated your Weaviate database with pictures of cute dogs and the vector representations of them!
Here is a recap of what we've done so far:
- Defined the Weaviate schema
- Converted the images to base64 values
- Uploaded the data objects to Weaviate

Flask Application
Flask is a web application framework written in Python. Using Flask is a quick and easy way to build a web application, so we will use it in this guide.
Application File
First, we will need to create our Flask application and connect it to our Weaviate client.
app = Flask(__name__)
app.config["UPLOAD_FOLDER"] = "/temp_images"
client = weaviate.Client("http://localhost:8080")
We will use the nearImage operator in Weaviate, so that it will search for images closest to the image uploaded by the user. To do this we will construct the weaviate_img_search function to get the relevant results. The response from our search query will include the closest objects in the Dog class. From the response, the function will output the dog image with the breed name and filepath. Note that the query is also formulated so that the response is limited to two results.
def weaviate_img_search(img_str):
   sourceImage = { "image": img_str}

   weaviate_results = client.query.get(
       "Dog", ["filepath","breed"]
       ).with_near_image(
           sourceImage, encode=False
       ).with_limit(2).do()

   return weaviate_results["data"]["Get"]["Dog"]
How cool is that? We can find visually similar dogs in just a simple query to Weaviate. We could even scale this to millions of images running in milliseconds with Weaviate's ANN index.
Once we've created the app, we need to define the pages that will be on the website. The homepage will have the ten images of the dogs in our dataset. If you add images, it will also populate on the homepage!
The /process_image page will show the uploaded image along with the results from Weaviate. Once we have the image stored and converted to base64, we will send it to the weaviate_img_search function to return the results and re-render the page.
The code block below will:
- Populate the homepage with the images from the dataset.
- Save the uploaded image and convert it to base64
- Return the
nearImageresults from Weaviate to return the filepaths and breeds
@app.route("/") # defining the pages that will be on the website
   def home(): # home page
       return render_template("index.html", content = list_images())

   @app.route("/process_image", methods = ["POST"]) # save the uploaded image and convert it to base64
   # process the image upload request by converting it to base64 and querying Weaviate
   def process_image():
           uploaded_file = Image.open(request.files['filepath'].stream)
           buffer = BytesIO()
           uploaded_file.save(buffer, format="JPEG")
           img_str = base64.b64encode(buffer.getvalue()).decode()

           weaviate_results = weaviate_img_search(img_str)
           print(weaviate_results)

           results = []
           for result in weaviate_results:
               results.append({
                   "path": result["filepath"],
                   "breed": result["breed"]
               })

           print(f"\n {results} \n")
           return render_template("index.html", content = results, dog_image = img_str)
Our index.html template has been set up to show images of the returned dog breeds.
{ % for x in content % }
<div class="imgCard">
    <img src = "./static/img/" + x["path"] > </img>
    <h4> {{x["breed"]}} </h4>
</div>
{ % endfor % }
We then run the application as follows:
if __name__ == "__main__":
   app.run()
Now you will run this file with;
python flask-app/application.py
If you navigate to 127.0.0.1, you will see the running web app.
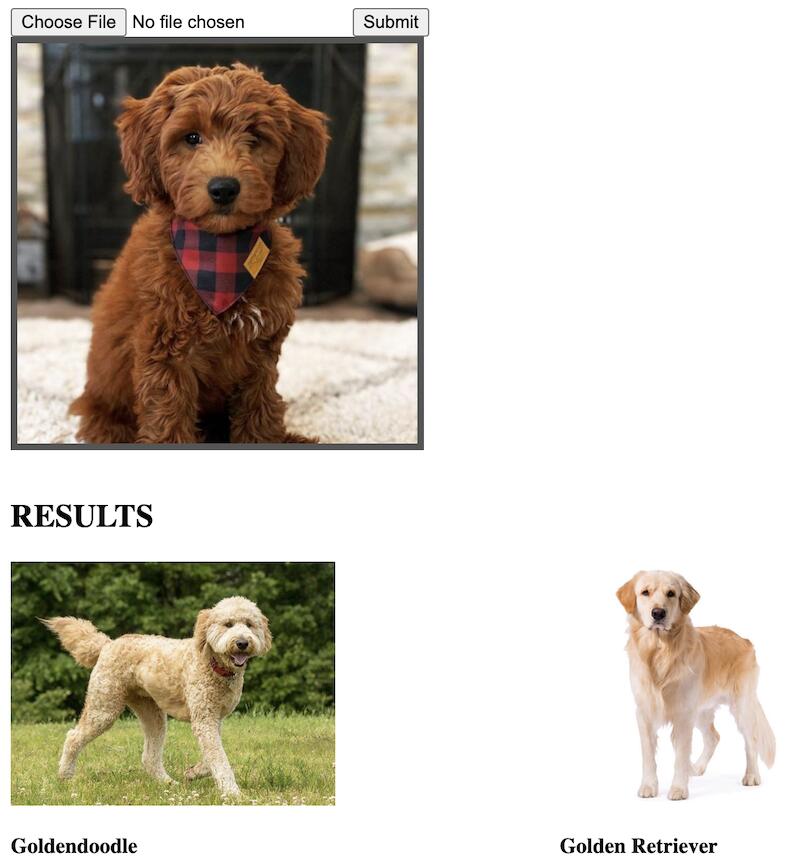
Let's test a query to see which dog looks most similar to a Goldendoodle puppy. We can see that the puppy resembles the Goldendoodle and Golden Retriever that are in our database.

And just like that, you've built a complete app! Users can load an image of their favorite dog and see the nearest neighbor breed in the database!
Summary
In this demo, we reviewed how to:
- Create and upload your data schema
- Connect the Weaviate demo to a web application using Flask
- Use the nearImage operator in Weaviate
And while this example uses a small dataset, Weaviate can power image searches like this at scale with very large datasets and in production environments. We think that you will be impressed at how fast it is, and how quickly you can build amazing search capabilities with image datasets. And when you do - please tell us all about it! We love hearing from our users in our great community.
Thanks for reading, and see you soon. You can also check out the other great Weaviate demos on GitHub!
Ready to start building?
Check out the Quickstart tutorial, or build amazing apps with a free trial of Weaviate Cloud (WCD).
Don't want to miss another blog post?
Sign up for our bi-weekly newsletter to stay updated!
By submitting, I agree to the Terms of Service and Privacy Policy.
