
How to Create Your Own ChatGPT Plugin
Introduction
A couple weeks back in our blog on ChatGPT plugins we talked about the potential for plugins to help expand ChatGPT�’s functionality by allowing it to leverage third-party resources to act upon the conversations that you have with it. The value for these plugins is greatest when they help make up for a current short-coming that ChatGPT has. For example ChatGPT is built on top of GPT 4.0 which is a large language model which doesn’t understand mathematical and algebraic reasoning as well as it does written language and thus using the WolframAlpha plugin as a “math-mode” when needing to solve mathematical problems makes perfect sense!
Another short-coming of ChatGPT we spoke about was that it lacks the use of context in answering your questions unless this context is specifically conveyed in the body of the prompt. The solution to this shortcoming was the ChatGPT retrieval plugin which connects ChatGPT to a vector database which provides a robust solution to the above problem. The vector database connected to ChatGPT can be used to store and refer to relevant information when answering prompts and acts as longterm memory of the LLM.
Plugins are a very powerful way that you and I can contribute to improving LLM use-cases without having to retrain the underlying GPT model. Let’s say you’re using ChatGPT and realize that it doesn't carry a conversation well enough when you ask it a question about the weather or it doesn’t have a specialized enough understanding of your health to suggest tasty and healthy recipes based on your previous blood sugar, pressure levels and health conditions. You can create a plugin to tackle these problems and in doing so improve usability for everyone since they can simply install your plugin and use it!
The only questions then are how do you get access to the exclusive plugin alpha that OpenAI is running and how do you go about creating a plugin for ChatGPT!? Worry not, we come bearing good news on both notes 😀.
Weaviate is partnering with OpenAI and Cortical Ventures to host a full-day Generative AI Hackathon at ODSC East on May 11th in Boston at the Hynes Convention Center. There you will get access to the OpenAI API and ChatGPT plugin tokens that OpenAI is providing and you will be able to create your own plugins as well as AutoGPT-like apps to solve problems near and dear to your heart using tools like ChatGPT and Weaviate! You can register using the link provided above, slots are limited so don’t delay!

Now getting to how you can create your own plugin for ChatGPT, here we will go through the step-by-step process of how we created the Weaviate Retrieval Plugin. The Weaviate retrieval plugin connects ChatGPT to an instance of Weaviate and allows it to query relevant documents from the vector database, upsert documents to “remember” information for later and also delete documents to “forget” them! The process that we took to create this plugin is quite similar to what one might take in creating a general plugin and thus we believe it’s quite instructive and we hope that it helps!
How to Create a ChatGPT Plugin


The entire code repository for the complete Weaviate Retrieval Plugin is located here. Let’s go through the steps one-by-one including code snippets and some challenges we encountered and how we eventually solved them.
The tech stack we used to develop this plugin is as follows:
- Python: write everything in python
- FastAPI: the server used to run the plugin
- Pytest: to write and run our tests
- Docker: we create containers to build, test and deploy the plugin
Below are the steps we took to develop the plugin, Part 1 focuses on building a web application with our desired endpoint, Part 2 is specific to the development of a ChatGPT plugin while Part 3 is all about remote deployment using Fly.io. We cover the steps in order but feel free to skip steps depending on you level of comfort with the material.
Part 1: Building a Web App
Step 1: Setup the Development Environment
To setup our development environment we used Dev Containers. The devcontainer.json file was updated by adding Fly.io, Docker and Poetry. You can find other dev container templates here.
Step 2. Test the Setup
- After setting up the environment we tested that everything worked by:
Create a dummy endpoint which will simply respond with a
{“Hello”: “World”}object when called.
from fastapi import FastAPI

app = FastAPI()

@app.get("/")
def read_root():
    """
    Say hello to the world
    """
    return {"Hello": "World"}
-
Set up tests using PyTest which accomplish two goals - firstly we want to check that our Weaviate instance is up and running which is setup here and secondly that the Fast API endpoint is responding. Both of these tests are defined here
-
We also created a makefile to automate running and tests and firing up the endpoint. In our makefile we also specify a
runcommand which will spin up the server locally to ensure the network connectivity settings are all setup properly. You can also connect to port 8000 which is the default port that FastAPI listens to to check connectivity. -
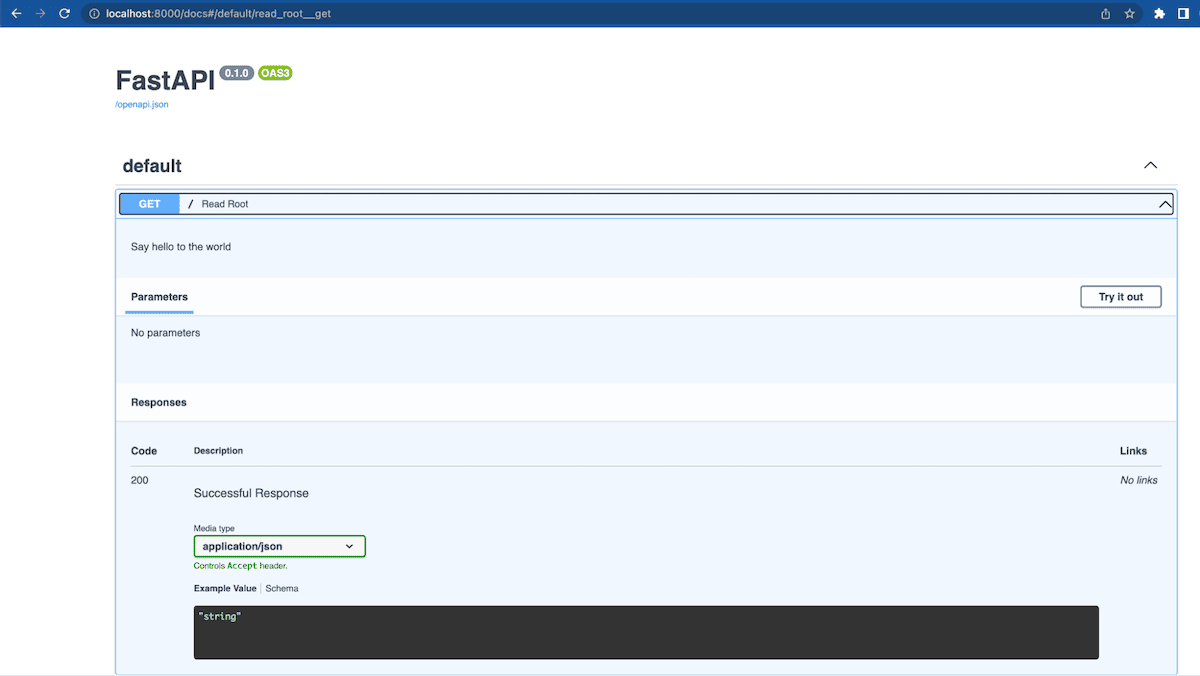
The last step to verify everything is running correctly is to go to
localhost:8000/docswhich should give you the Swagger UI for your endpoint. The Swagger UI gives you the ability to play around with your server, interact with any endpoints you may have defined, and it all gets updated in real-time - this is particularly convenient when we later want to call endpoints manually to interact with our Weaviate instance to query, upsert and delete objects.
 Once you've done all of the above and everything looks to be in good order you can start implementing plugin specific functions.
Step 3: Implement a function to get vector embeddings
Since we are implementing a plugin that connects a vector database to ChatGPT we will need to define a way to generate vector embeddings which can be used when we upsert documents to our database to generate and store vector embeddings for our documents, this function will also be used to vectorize queries when querying and performing vector search over the vector database. This function is implemented here.
import openai

def get_embedding(text):
    """
    Get the embedding for a given text
    """
    results = openai.Embedding.create(input=text, model="text-embedding-ada-002")

    return results["data"][0]["embedding"]
Here we simply chose to use the ada-002 model as OpenAI specifies that this particular model is used for their template retrieval plugin, however since the querying is done in the vector database we could have chosen to use any vectorizer.
Step 4: Implement function to initialize the Weaviate Client and vector database
Next we implement a couple of functions to initialize the Weaviate python client and through the client initialize the Weaviate instance by checking if a schema exists and if it doesn’t we add one.
import weaviate
import os
import logging

INDEX_NAME = "Document"

SCHEMA = {
    "class": INDEX_NAME,
    "properties": [
        {"name": "text", "dataType": ["text"]},
        {"name": "document_id", "dataType": ["string"]},
    ],
}


def get_client():
    """
    Get a client to the Weaviate server
    """
    host = os.environ.get("WEAVIATE_HOST", "http://localhost:8080")
    return weaviate.Client(host)


def init_db():
    """
    Create the schema for the database if it doesn't exist yet
    """
    client = get_client()

    if not client.schema.contains(SCHEMA):
        logging.debug("Creating schema")
        client.schema.create_class(SCHEMA)
    else:
        class_name = SCHEMA["class"]
        logging.debug(f"Schema for {class_name} already exists")
        logging.debug("Skipping schema creation")
Step 5: Initialize the database when the server starts and add a dependency for the Weaviate client
We now need to integrate the usage of these functions so that on starting the ChatGPT plugin server up we automatically initialize the Weaviate instance and connection of the client. We do this by using FastAPI’s lifespan feature in the main server python script which gets run every time the server starts. This simple function calls our database initialization function defined above which yields the Weaviate client object. Any logic that needs to be run on server shutdown can be included after the yield statement below. Since we don’t need to do anything specific for our plugin we leave it empty.
from fastapi import FastAPI
from contextlib import asyncontextmanager

from .database import get_client, init_db

@asynccontextmanager
async def lifespan(app: FastAPI):
    init_db()
    yield


app = FastAPI(lifespan=lifespan)

def get_weaviate_client():
    """
    Get a client to the Weaviate server
    """
    yield get_client()
After this point the initial server setup and testing is complete. Now we get to the fun part of implementing our endpoints that will give ChatGPT different ways to interact with our plugin!
Part 2: Implementing OpenAI Specific Functionality

Step 1: Development of the Weaviate Retrieval Plugin specific endpoints
Our plugin has three specific endpoints: /upsert, /query and /delete. These functions give ChatGPT the ability to add objects to the Weaviate instance, query and search through objects in the Weaviate instance and lastly delete objects if needed. Upon interacting with ChatGPT while the plugin is enabled it can be instructed to use a particular endpoint via prompt but will also independently decide when to use the appropriate endpoint to complete the response to a query! These endpoints are what extend the functionality of ChatGPT and enable it to interact with the vector database.
We developed these three endpoints through test driven development, as such we will display the tests that each endpoint must first pass and then the implementation that satisfies these tests. In preparation to setup the Weaviate instance for these tests we added the following test documents through a fixture:
@pytest.fixture
def documents(weaviate_client):
    docs = [
        {"text": "The lion is the king of the jungle", "document_id": "1"},
        {"text": "The lion is a carnivore", "document_id": "2"},
        {"text": "The lion is a large animal", "document_id": "3"},
        {"text": "The capital of France is Paris", "document_id": "4"},
        {"text": "The capital of Germany is Berlin", "document_id": "5"},
    ]

    for doc in docs:
        client.post("/upsert", json=doc)
Implementing the /upsert endpoint:
After using the /upsert endpoint we mainly want to test that that we got the appropriate status code in addition to checking that the content, id and vector’s were all upserted correctly.
Here's the test that carries this out:
def test_upsert(weaviate_client):
    response = client.post("/upsert", json={"text": "Hello World", "document_id": "1"})
    assert response.status_code == 200

    docs = weaviate_client.data_object.get(with_vector=True)["objects"]
    assert len(docs) == 1
    assert docs[0]["properties"]["text"] == "Hello World"
    assert docs[0]["properties"]["document_id"] == "1"
    assert docs[0]["vector"] is not None
The implementation below satisfies all of these requirements and tests above:
@app.post("/upsert")
def upsert(doc: Document, client=Depends(get_weaviate_client)):
    """
    Insert a document into weaviate
    """
    client.batch.configure(batch_size=100)  # Configure batch
    with client.batch as batch:
        batch.add_data_object(
            data_object=doc.dict(),
            class_name=INDEX_NAME,
            vector=get_embedding(doc.text),
        )

    return {"status": "ok"}
The /query and /delete endpoints were developed similarly, if you're interested you can read below!
See details for /query endpoint implementation.
Implement the /query endpoint:
For this endpoint we mainly want to check that it returns the right number of objects and that the required document that we were expecting is part of the returned objects.
def test_query(documents):
    LIMIT = 3
    response = client.post("/query", json={"text": "lion", "limit": LIMIT})

    results = response.json()

    assert len(results) == LIMIT
    for result in results:
        assert "lion" in result["document"]["text"]
The implementation below will take in a query and return a list of retrieved documents and metadata.
@app.post("/query", response_model=List[QueryResult])
def query(query: Query, client=Depends(get_weaviate_client)) -> List[Document]:
    """
    Query weaviate for documents
    """
    query_vector = get_embedding(query.text)

    results = (
        client.query.get(INDEX_NAME, ["document_id", "text"])
        .with_near_vector({"vector": query_vector})
        .with_limit(query.limit)
        .with_additional("certainty")
        .do()
    )

    docs = results["data"]["Get"][INDEX_NAME]

    return [
        QueryResult(
            document={"text": doc["text"], "document_id": doc["document_id"]},
            score=doc["_additional"]["certainty"],
        )
        for doc in docs
    ]
See details for /delete endpoint implementation.
Implement the /delete endpoint:
Here we simply want to check that the response returned correctly and that after removing one object we the number of total objects in the Weaviate instance goes down by one.
def test_delete(documents, weaviate_client):
    num_docs_before_delete = weaviate_client.data_object.get()["totalResults"]

    response = client.post("/delete", json={"document_id": "3"})
    assert response.status_code == 200

    num_docs_after_delete = weaviate_client.data_object.get()["totalResults"]

    assert num_docs_after_delete == num_docs_before_delete - 1
And the implementation of the endpoint is as follows:
@app.post("/delete")
def delete(delete_request: DeleteRequest, client=Depends(get_weaviate_client)):
    """
    Delete a document from weaviate
    """
    result = client.batch.delete_objects(
        class_name=INDEX_NAME,
        where={
            "operator": "Equal",
            "path": ["document_id"],
            "valueText": delete_request.document_id,
        },
    )

    if result["results"]["successful"] == 1:
        return {"status": "ok"}
    else:
        return {"status": "not found"}
Here we showed you how our endpoints work, this will be where your plugin will be most unique, depending on what functionality you want implemented you can create corresponding endpoints and test them.
Notice the docstrings we’ve included with all of our endpoints, these will be very important in the next step!
Step 2: Prepare plugin manifest files
This is where you specify to OpenAI and specifically ChatGPT which endpoints your plugin is exposing, how it can use those endpoints to accomplish specific tasks, what errors to expect if the endpoints are not used correctly and much more! OpenAI instruction specify that you need to create two files: the openapi.yaml file and the ai-plugin.json file.
As you can see both of these files need to be in the .well-known directory which must be mounted into the app as follows in order for ChatGPT to utilize them correctly.
app.mount("/.well-known", StaticFiles(directory=".well-known"), name="static")
Lets have a closer look at at the two files:
ai-plugin.json
{
    "schema_version": "v1",
    "name_for_human": "Weaviate Retrieval Plugin V2",
    "name_for_model": "Weaviate_Retrieval_Plugin",
    "description_for_human": "Plugin to interact with documents using natural language. You can query, add and remove documents.",
    "description_for_model": "Plugin to interact with documents using natural language. You can query, add and remove documents.",
    "auth": {
        "type": "user_http",
        "authorization_type": "bearer"
      },
    "api": {
        "type": "openapi",
        "url": "https://demo-retrieval-app.fly.dev/.well-known/openapi.yaml",
        "is_user_authenticated": false
    },
    "logo_url": "https://demo-retrieval-app.fly.dev/.well-known/logo.png",
    "contact_email": "support@example.com",
    "legal_info_url": "http://www.example.com/legal"
}
This specifies data such as the name of the app, logo assets, and more interestingly, under the name_for_model field, how the model(in this case ChatGPT/GPT4.0) will refer to the plugin and the description of the plugin,description_for_model, that can be read and understood by the model.
openapi.yaml
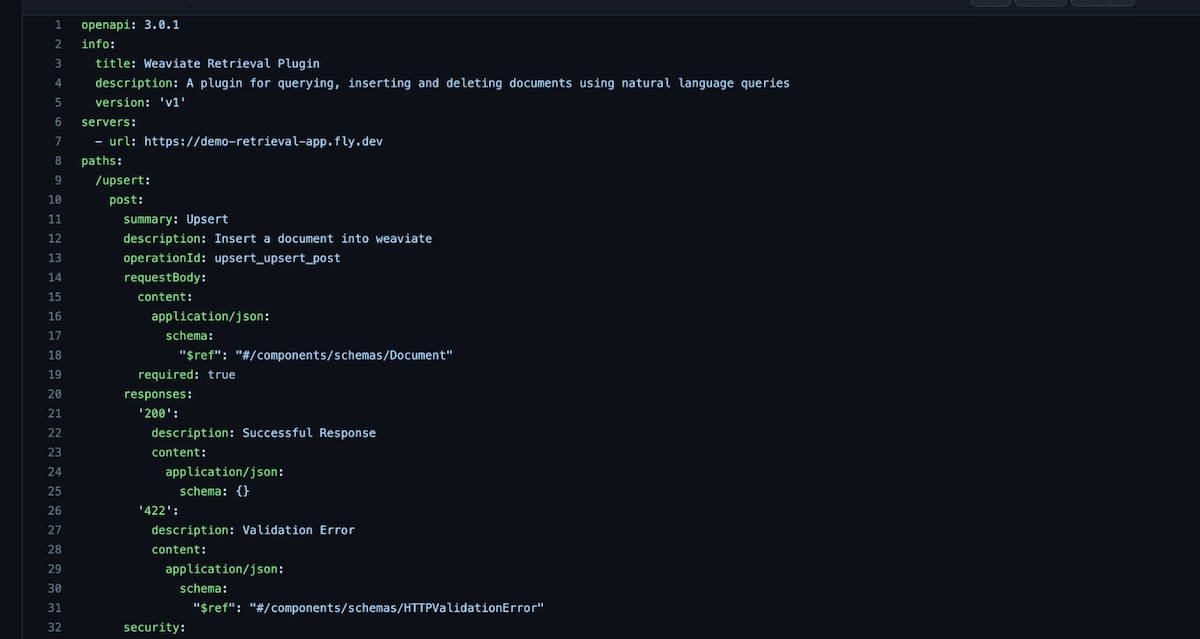
This file most importantly specifies the endpoints and describes each one to ChatGPT.
Generating this .yaml file was quite challenging until we realized that you could simply generate the spec in json format by going to the SwaggerUI using /docs and clicking on the /openapi.json link. Then you can use this website to convert from .json to .yaml.
These two files are critical in order for ChatGPT to understand and utilize the exposed endpoints for your plugin correctly.
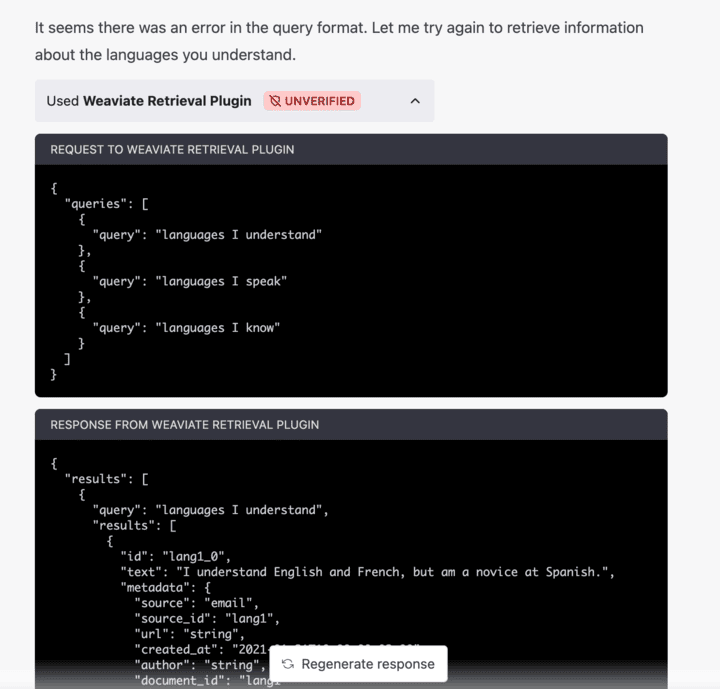
One very interesting finding in our experiments was that ChatGPT reads these files to understand not just when to use the endpoints but also how to correctly use them! So if ChatGPT is not correctly using your endpoints you should try and improve the descriptions for the plugin and the endpoints. OpenAI includes some best practices for creating these descriptions. From our experiments we found that if the description was not sufficient in describing how the endpoint should be used ChatGPT would call the endpoints with the incorrect syntax and would try again if it did fail. See the example below:
Take-aways: ChatGPT doesn’t have hard-coded instructions on when and how to use the plugin endpoints. You need to be very careful about how you describe your plugin and endpoints to ChatGPT so that they can be used as intended! The openapi.json spec that FastAPI generates for you is based on how you documented the endpoints in your code i.e. the function’s name, docstring, query description and the field’s description in your pydantic models. The steps used to do this are outside the scope of this blog post, for more details please refer to the FastAPI documentation. In general you want to have complete and comprehensive documentation for your plugin because the documentation is what will allow it to be used correctly!
Additionally you have to be careful when specifying the descriptions, doc strings etc. not to exceed the context length since the plugin description, API requests, and API responses are all inserted into the conversation with ChatGPT. This counts against the context limit of the model.
Step 3: Local deployment of your plugin and testing using the ChatGPT user interface
Allow http://localhost:8000 and https://chat.openai.com to make cross requests to the plugin’s server. We can do this easily with FastAPI’s CORSMiddleware middleware.
# for localhost deployment
if os.getenv("ENV", "dev") == "dev":
    origins = [
        f"http://localhost:8000",
        "https://chat.openai.com",
    ]

    app.add_middleware(
        CORSMiddleware,
        allow_origins=origins,
        allow_credentials=True,
        allow_methods=["*"],
        allow_headers=["*"],
    )
The above code will only be used during local testing and will enable your locally deployed app to talk with ChatGPT. Note that our plugin actually has two apps which differ based on the type of authentication used, for the local deployment and testing we don’t use authentication and for remote deployment we use Bearer tokens and https as we will explain later. Following this you can run the plugin locally by following the instructions detailed here. This will allow you to test all the endpoints through the ChatGPT UI and see they are functioning correctly.
Have a look at some of the endpoint testing we did locally before moving onto the next point:
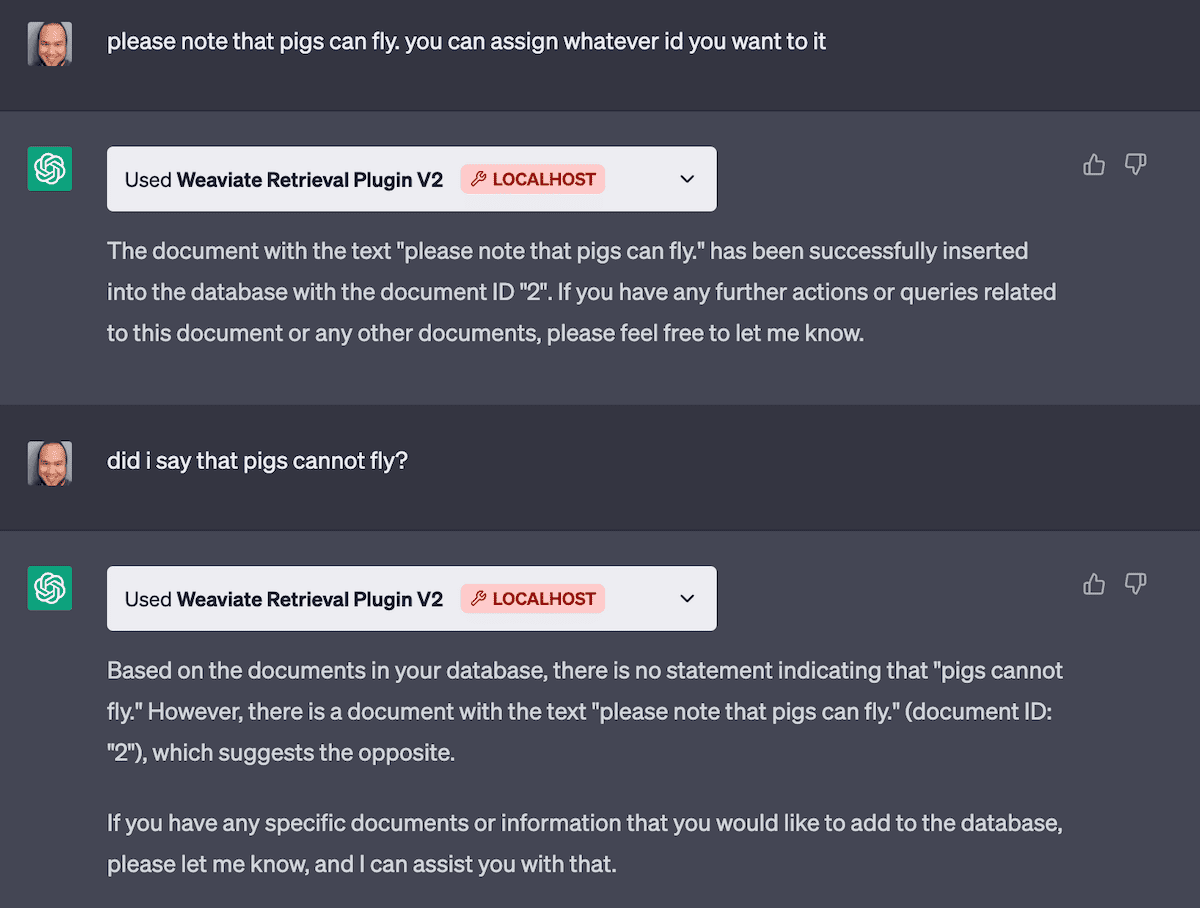
 Making sure the upsert and query endpoints are working correctly. Note that here depending on the language used in our prompt ChatGPT will choose to call the appropriate endpoints.
Part 3: Remote Deployment to Fly.io
Step 1: Prepare to deploy plugin remotely to Fly.io
Once we have tested the plugin locally to our satisfaction we can deploy remotely and install it into ChatGPT. Here are the steps we follow to share our plugin with those who have access to the alpha:
-
Create a remote Weaviate Instance: This was done using the Weaviate Cloud
-
Add a dockerfile. This dockerfile is just a modified version the file template provided by OpenAI and will be used to setup your environment remotely and starts up the server.
-
Update the plugin manifest config files
ai-plugin.jsonandopenapi.yamlto now use authentication in the form of a bearer token and your newly created WCD instance instead of localhost. -
Update the app to make sure all communication is authenticated.
You can see the full diff for the project as setup for local deployment thus far and how it was changed to ready it for remote deployment here.
Step 2: Deploy to Fly.io and Install in ChatGPT
This is the last step and allows you to deploy your plugin to Fly.io, the detailed instructions provided here can be followed as is. Following this you can open up ChatGPT in your browser and if you have access to the plugin alpha you can install your plugin by specifying the URL where it is hosted and provide the bearer token to authenticate.
Conclusions
And that, ladies and gentlemen, is how we created our Weavaite retrieval plugin that augments ChatGPT with longterm memory. The process to create different plugins is quite similar and we believe most of these steps can be executed in a similar manner to create a wide variety of plugins with the most variation being found in Part 2 where you define endpoint specific to you plugin.
Let's end off by visualizing the flow of how ChatGPT can now use the plugin we just created. The figure below details how the /query endpoint can be used. Depending on the prompt it can also call the /delete and /upsert endpoints as well.

 More specifically when the user prompts ChatGPT it will look at the
 openapi.yaml file to read the endpoint descriptions and will decide the appropriate endpoint to use in the execution of the prompt. Above it chooses to use the /query endpoint. Then it will try to build the correct request and retry upon failure. The query will return to ChatGPT relevant documents from Weaviate which it will use to answer the original prompt!
Ready to start building?
Check out the Quickstart tutorial, or build amazing apps with a free trial of Weaviate Cloud (WCD).
Don't want to miss another blog post?
Sign up for our bi-weekly newsletter to stay updated!
By submitting, I agree to the Terms of Service and Privacy Policy.