
Achieve Zero-Downtime Upgrades with Weaviate’s Multi-Node Setup

The tyranny of database downtime
Like the old saying goes, a chain is only as strong as its weakest link. For tech infrastructure products, the weak link can often be its uptime. Think about how big a deal it is when social networks, web apps or databases are not available.
This is why we at Weaviate really pride ourselves on having a robust, production-ready database that can scale as our users do. For example, many of our users already run Weaviate with multi-tenancy (introduced in version 1.20) to host thousands of active tenants or even more.
One side effect of scaling is that as load increases on each node, it will take longer to start up. While a fresh Weaviate instance typically starts up essentially instantaneously, a node with 1000s of tenants can take up over 1 minute.
Node-level downtime is an unavoidable fact of life, since either hardware and software may necessitate restarts for maintenance and/or updates. But node-level downtime doesn’t have to lead to user-level downtime and failed requests.
How, you ask? Having redundancy is key to achieving this. And such redundancy, or replication, has been available for a while in Weaviate for production use.
In fact, configuring replication is actually easy and simple, and using it can lead to huge benefits. In this post, we will explain the benefits of replication and show you how to configure it.
- Node: A single machine in a cluster. It often refers to a physical or virtual machine that runs part of an application or service.
- Pod: A Kubernetes term for a group of one or more containers, with shared storage/network, and a specification for how to run the containers. Pods are the smallest deployable units in Kubernetes.
- Tenant: In the context of Weaviate, an isolated environment or subsection within the system, designed to separate data and access between different end users or groups.
Enabling replication in Weaviate
Just the simple act of enabling replication on a Weaviate cluster will provide huge benefits. Doing so might actually be simpler than you might imagine.
How to enable replication on Weaviate Cloud (WCD)
Enabling replication on a Weaviate Cloud cluster is as simple as selecting the Enable High Availability button at cluster creation time. (Not available on sandboxes.)
This will enable a multi-node configuration in Weaviate and ensures that each class is configured with the appropriate replication factor.
How to enable replication on self-deployed Weaviate
Enabling replication in a self-deployment setup such as a Docker or Kubernetes setup involves the following two steps. First, modify the configuration file to enable a multi-node setup (e.g. 3), and add the replicationConfig setting to the collection definition like so:
{
  class: YOUR_CLASS_NAME,
  ...
  replicationConfig: {
    factor: 3
  }
}
The replication factor should be less than or equal to the number of nodes.
Once you’ve modified the configuration file and set the replication factor, you should have a multi-node setup. If you are keen to try running a multi-node setup yourself, follow the optional guide here. Or you can read ahead ;).
Optional: Try it yourself (with minikube)
You can try running a local, multi-node Weaviate cluster with minikube, which can conveniently run a local Kubernetes cluster. We note that deploying Weaviate on a cloud provider’s kubernetes service follows a similar process.
First, install minikube and helm for your system by following these guides (minikube, helm). We also recommend installing kubectl (by following this guide).
Once minikube is installed, start a three-node minikube cluster by running the following from the shell:
minikube start --nodes 3
Once the nodes have been created, you should be able to interact with them through the kubectl command-line tool. To see a list of the newly spun up nodes, run:
kubectl get nodes -o wide
You should see an output similar to the following, indicating that three nodes are up and onto which you can deploy Weaviate:
NAME           STATUS   ROLES           AGE    VERSION   INTERNAL-IP    EXTERNAL-IP   OS-IMAGE             KERNEL-VERSION     CONTAINER-RUNTIME
minikube       Ready    control-plane   134m   v1.27.3   192.168.49.2   <none>        Ubuntu 22.04.2 LTS   5.15.49-linuxkit   docker://24.0.4
minikube-m02   Ready    <none>          134m   v1.27.3   192.168.49.3   <none>        Ubuntu 22.04.2 LTS   5.15.49-linuxkit   docker://24.0.4
minikube-m03   Ready    <none>          133m   v1.27.3   192.168.49.4   <none>        Ubuntu 22.04.2 LTS   5.15.49-linuxkit   docker://24.0.4
Now, add the Weaviate helm repository to your local helm configuration by running:
helm repo add weaviate https://weaviate.github.io/weaviate-helm
And save the default configuration with:
helm show values weaviate/weaviate > values.yaml
Edit values.yaml by changing the root-level configuration replicas: 1 for the root image to replicas: 3, and save it.
...
# Scale replicas of Weaviate. Note that as of v1.8.0 dynamic scaling is limited
# to cases where no data is imported yet. Scaling down after importing data may
# break usability. Full dynamic scalability will be added in a future release.
replicas: 3
...
You can now deploy Weaviate in this configuration by running:
kubectl create namespace weaviate

helm upgrade --install \
  "weaviate" \
  weaviate/weaviate \
  --namespace "weaviate" \
  --values ./values.yaml
This will deploy the Weaviate clusters. You can check the status of the deployment by running:
kubectl get pods -n weaviate
This should produce an output similar to the following:
NAME         READY   STATUS    RESTARTS   AGE
weaviate-0   1/1     Running   0          3m00s
weaviate-1   1/1     Running   0          2m50s
weaviate-2   1/1     Running   0          2m40s
Now, you need to expose the Weaviate service to the outside world - i.e. to your local machine. You can do this by running:
minikube service weaviate --namespace weaviate
This should show an output similar to the following that shows the URL to access the Weaviate cluster:
|-----------|----------|-------------|------------------------|
| NAMESPACE |   NAME   | TARGET PORT |          URL           |
|-----------|----------|-------------|------------------------|
| weaviate  | weaviate |             | http://127.0.0.1:54847 |
|-----------|----------|-------------|------------------------|
And it should also open a browser window showing the list of Weaviate endpoints.
Just like that, you’ve got a multi-node Weaviate cluster. Remember that when you create a class, you must have replication enabled. You can do this by adding the replicationConfig parameter to the collection definition, like so:
{
  "class": "ClassWithReplication",
  "properties": [
    {
      "name": "exampleProperty",
      "dataType": ["text"]
    }
  ],
  "replicationConfig": {
    "factor": 3
  }
}
And when you insert objects into ClassWithReplication, they will be replicated across the three nodes. You can verify this by visiting the /nodes endpoint, which will verify that each node contains the same number of objects.
Benefits of replication
So, let’s cover the implications of doing this. What does replication get us? A big one is availability. With no replication, any node being down will make its data unavailable.
But in a Kubernetes setup composed of say, three Weaviate nodes (three Kubernetes “pods”) and a replication factor of three, you can have any one of the three nodes down and still reach consensus.
This reflects Weaviate’s leaderless replication architecture, meaning any node can be down without affecting availability at a cluster level as long as the right data is available somewhere.
You can see how replication significantly improves availability.
Weaviate provides further configurability and nuance for you in this area by way of a consistency guarantee setting. For example, a request made with a consistency level of QUORUM would require over half of the nodes which contain the data to be up, while a request with ONE consistency would only require one node to be up.
- The replication algorithm makes sure that no node holds a tenant twice. Replication is always spread out across nodes.
Implications for database maintenance
In production, this can dramatically reduce the critical downtime. Let’s take an example three-pod Kubernetes setup with 10,000 tenants, and see how replication affects availability during a rolling update of Weaviate versions.
Each Weaviate pod will restart one by one, as demonstrated in the example below (from kubectl get pods), which shows weaviate-2 as having been recently restarted and ready, while weaviate-1 is just restarting.

What will the cluster availability be like during this period? We performed an experiment simulating non-trivial load with ~3,800 queries per second to approximate a real-life scenario. Here are the results:
Queries during maintenance - without replication
The below figure shows results from our setup with no replication. The area chart at the top shows how many requests failed, and the line graph shows pod readiness.
We see immediately that over the course of the update time, just about one out of nine (11.5%) requests failed.
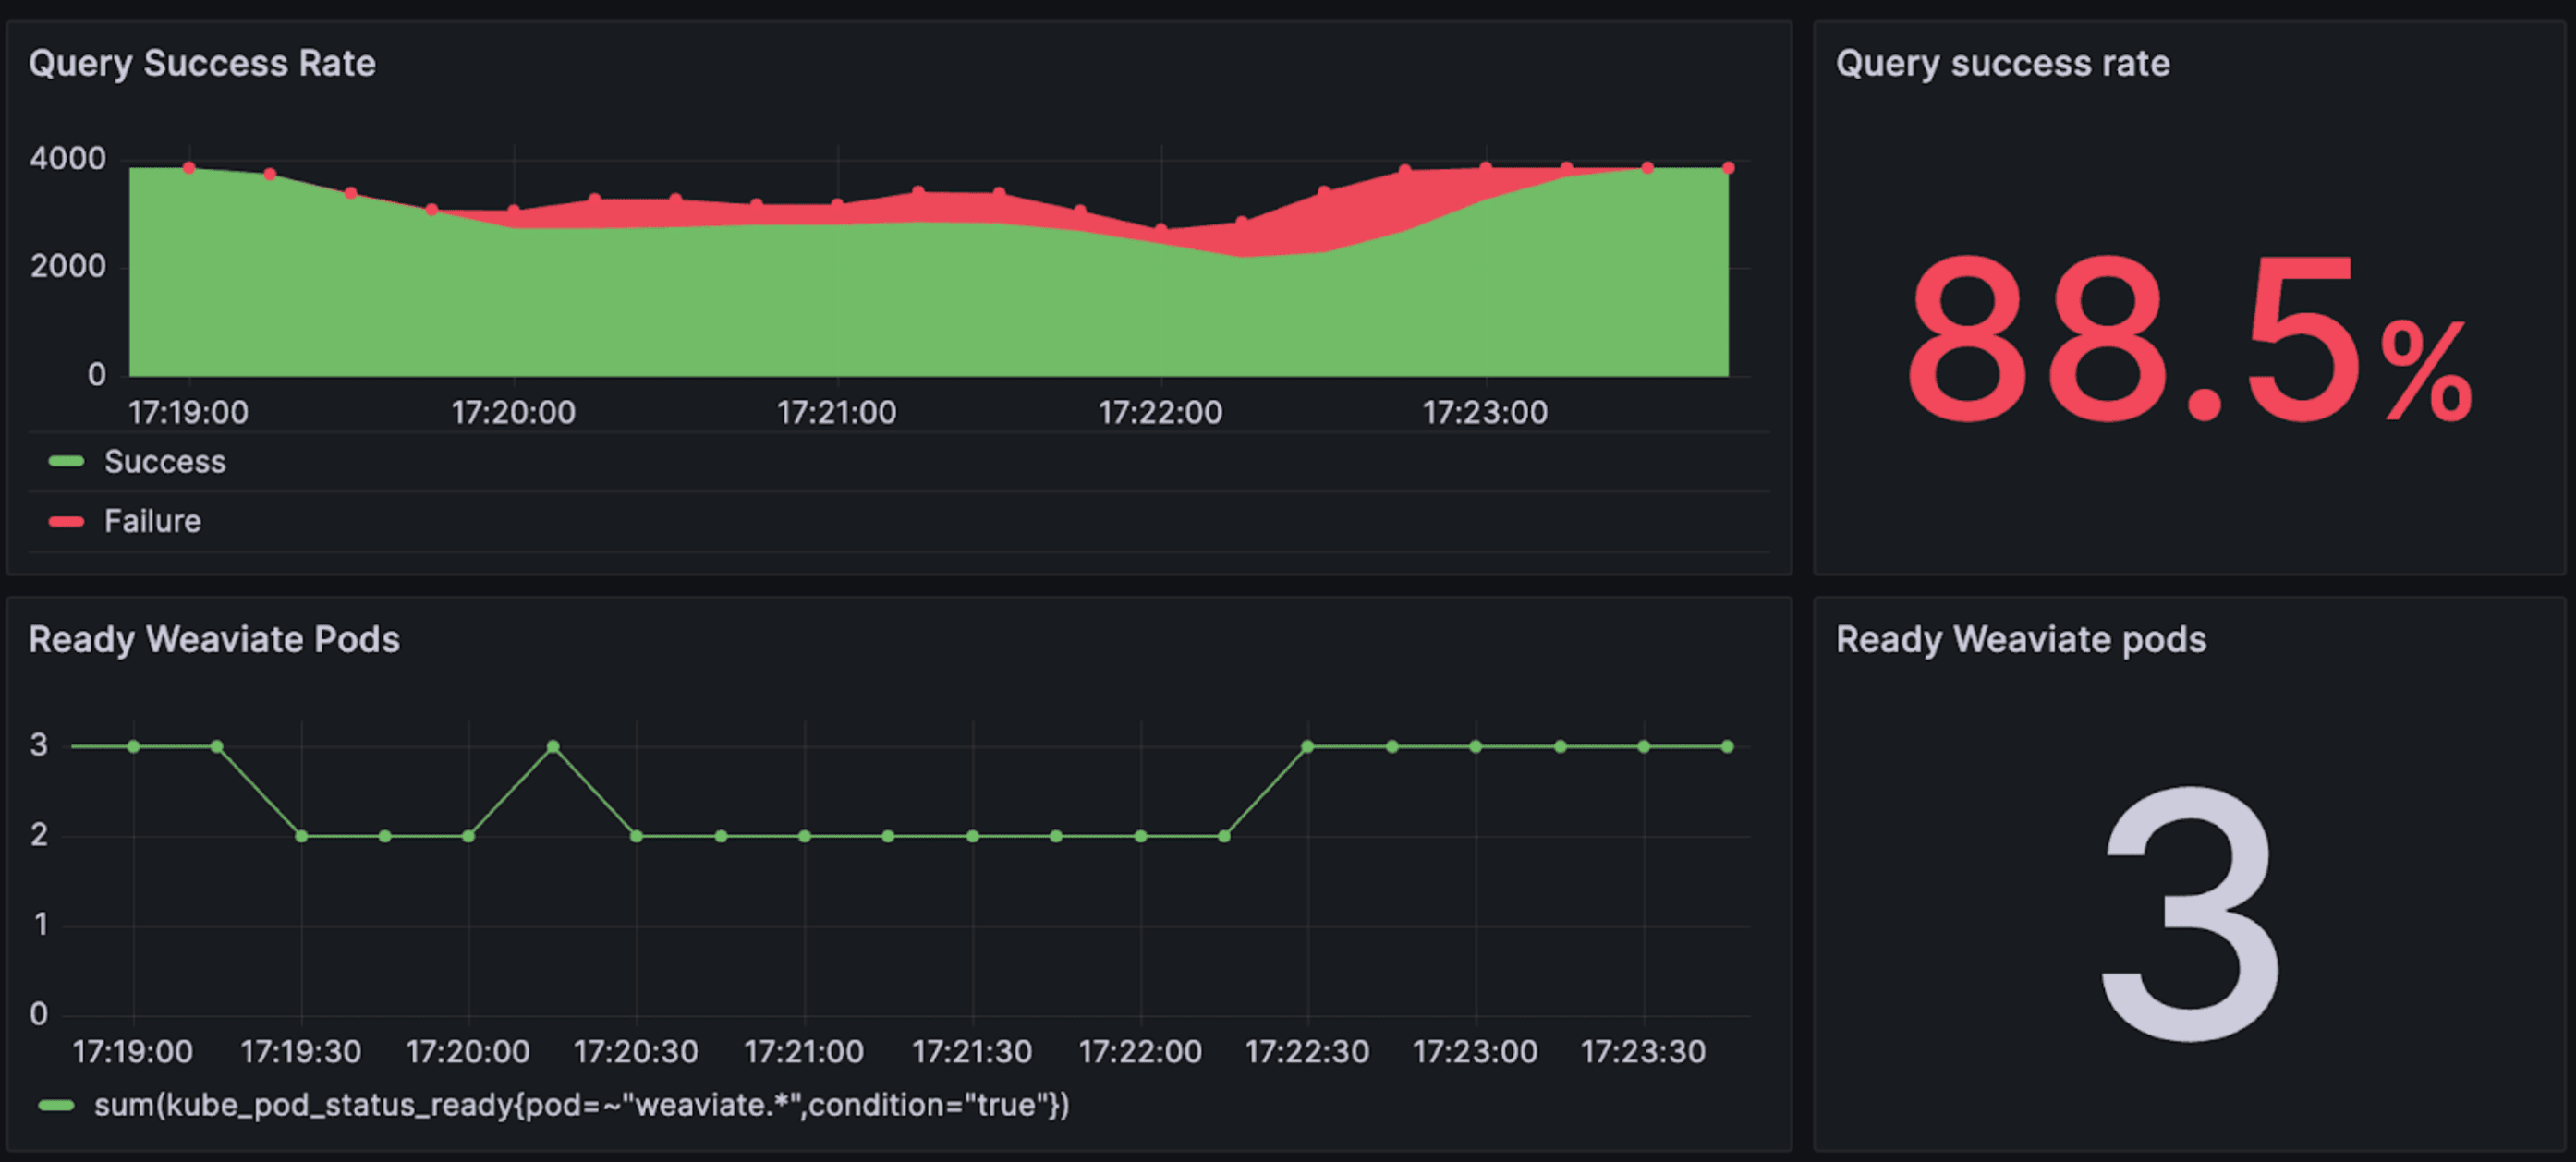
And at times, it is even worse, with the failure rate being as high as one in three when the node is down and before it starts to load tenants.
The failure rate here is less than one in three, as Weaviate is capable of loading tech tenant’s data (i.e. shard) and making them available. This makes the restarting node ‘partly’ available.
Queries during maintenance - with replication
On the other hand, this figure shows results from a scenario with replication configured with a factor of 3.
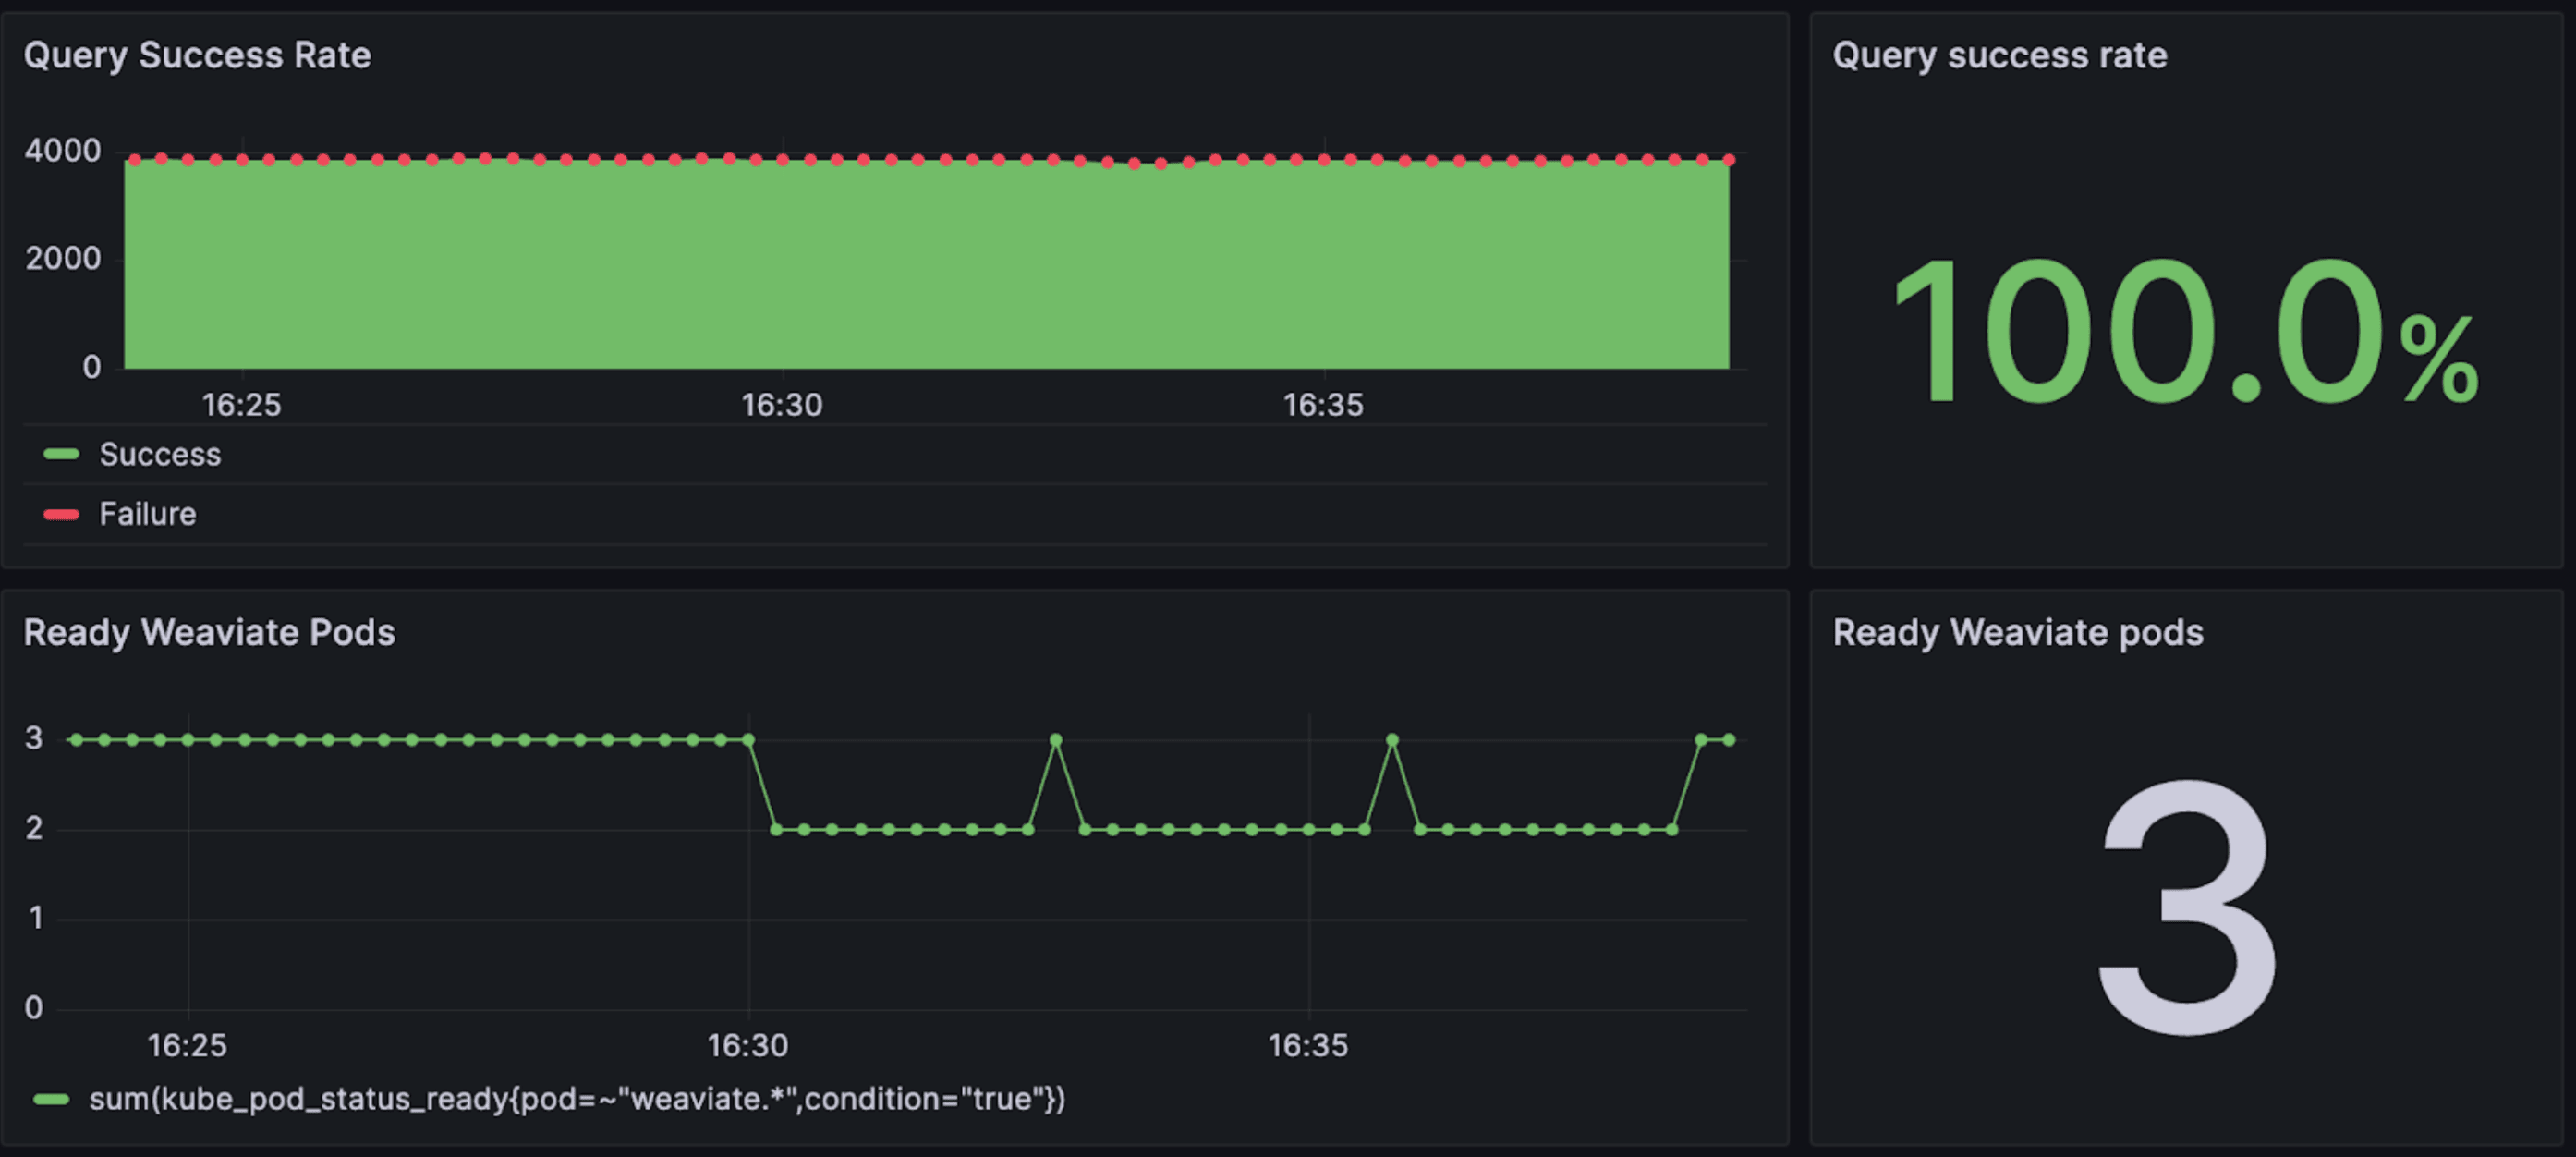
We see that a grand total of zero queries failed here over the course of 8-9 minutes, even though individual pods did go down as they did before. In other words, the end users wouldn’t even have noticed that a new version was rolled out, as node-level downtime did not lead to system-level downtime.
Did we mention that the only change between the two was setting the replication factor? It’s just that easy.
Before you rush off to switch on replication, though, stick with us to read about the trade-offs and our recommendations. 😉
Trade-offs & discussions
While replication and high availability are wonderful, we won’t quite pretend that it comes for free. Having additional replicas of course means that there are more tenants and objects overall. Although they are duplicated, they are just as real as objects as any others.
This means that a replication factor of 3 leads to the cluster essentially handling three times the load as no replication. The benefit here is of course redundancy and thus availability, but the cost is additional cost, such as increased hardware (e.g. memory) requirements. Note that the rolling update time was longer on our replication example than the non-replication example, as each pod now holds ~10,000 tenants rather than ~3,333 tenants.
Another challenge is that any write request that comes in while any nodes are down will be temporarily missing on that node for a while. This will be repaired in time through a read-repair that happens automatically in the background.
To reduce the length of this time, there is a proposed feature to proactively start repairing those inconsistencies (i.e. perform async replication). If this is important, please upvote the feature here.
But we think that the cost of high availability is worth these prices. We take system availability seriously, and architect Weaviate according to this philosophy. This is one of the reasons that we use leaderless replication, and why replication in the first place is so important to us - because it enables our users to have robust systems on which they can rely.
Take the longer start-up time for example. Adding replication caused node-level start-up time to increase in our experiment. But the end result was that a hundred percent of requests succeeded. In other words, the end user would not have noticed anything was going on. And again, what are peace of mind and avoiding the wrath of angry users during downtime worth to you??
Recommendations & Wrap-up
As we mentioned before, all you need to configure to enable replication is this in the collection definition:
{
  class: 'YOUR_CLASS_NAME',
  ...
  replicationConfig: {
    factor: 3,
  }
}
But what replication factor would we recommend? That’s something of a subjective question, but our starting recommendation is 3.
The reason is that odd numbers are preferred for consistency so that consensus can always be reached. Higher factors are also possible, but this is more of a measure to scale query throughput, rather than lead to more availability. And for more cost-sensitive applications, even 2 would introduce high availability and robustness to the system.
As we've mentioned before - using Weaviate Cloud is a convenient way to set up a cluster with replication enabled. Set the Enable High Availability button to Yes at cluster creation time, and it will spin up a multi-node cluster with replication enabled, including the appropriate replication factor for each class.
So there it is. We hope we’ve convinced you of the benefits of using replication, and how easy it is to use. For sure it might not be for everybody and every use case. But if you are using Weaviate at scale, in production, we believe enabling it will add significant value and encourage you to consider its use.
Ready to start building?
Check out the Quickstart tutorial, or build amazing apps with a free trial of Weaviate Cloud (WCD).
Don't want to miss another blog post?
Sign up for our bi-weekly newsletter to stay updated!
By submitting, I agree to the Terms of Service and Privacy Policy.