
Enrich your dataset with a Transformation Agent


Sign up here for notifications on Weaviate Agents, or visit this page to see the latest updates and provide feedback.
The Weaviate Transformation Agent is designed to modify data in Weaviate in place. While the Agent is in technical preview, do not use it in a production environment. The Agent may not work as expected, and the data in your Weaviate instance may be affected in unexpected ways.
In this tutorial, we will use the Transformation Agent to enrich data stored in Weaviate. We will build an agent that has access to a collection containing a bunch of research papers, their abstracts, and titles. We will then use the agent to create additional properties for each of our objects in the collection.
We've prepared a public dataset that you can use to explore the Transformation Agent, and it's available on Hugging Face:
- ArxivPapers: A dataset that lists titles and abstracts of research papers.
Introduction: What are Transformation Agents?
The Transformation Agent is able to access a Weaviate collection of your choosing and perform operations on the objects within it. However, each operation for the agent can be defined in natural language. The agent will then use an LLM to complete the instructions in the operation.
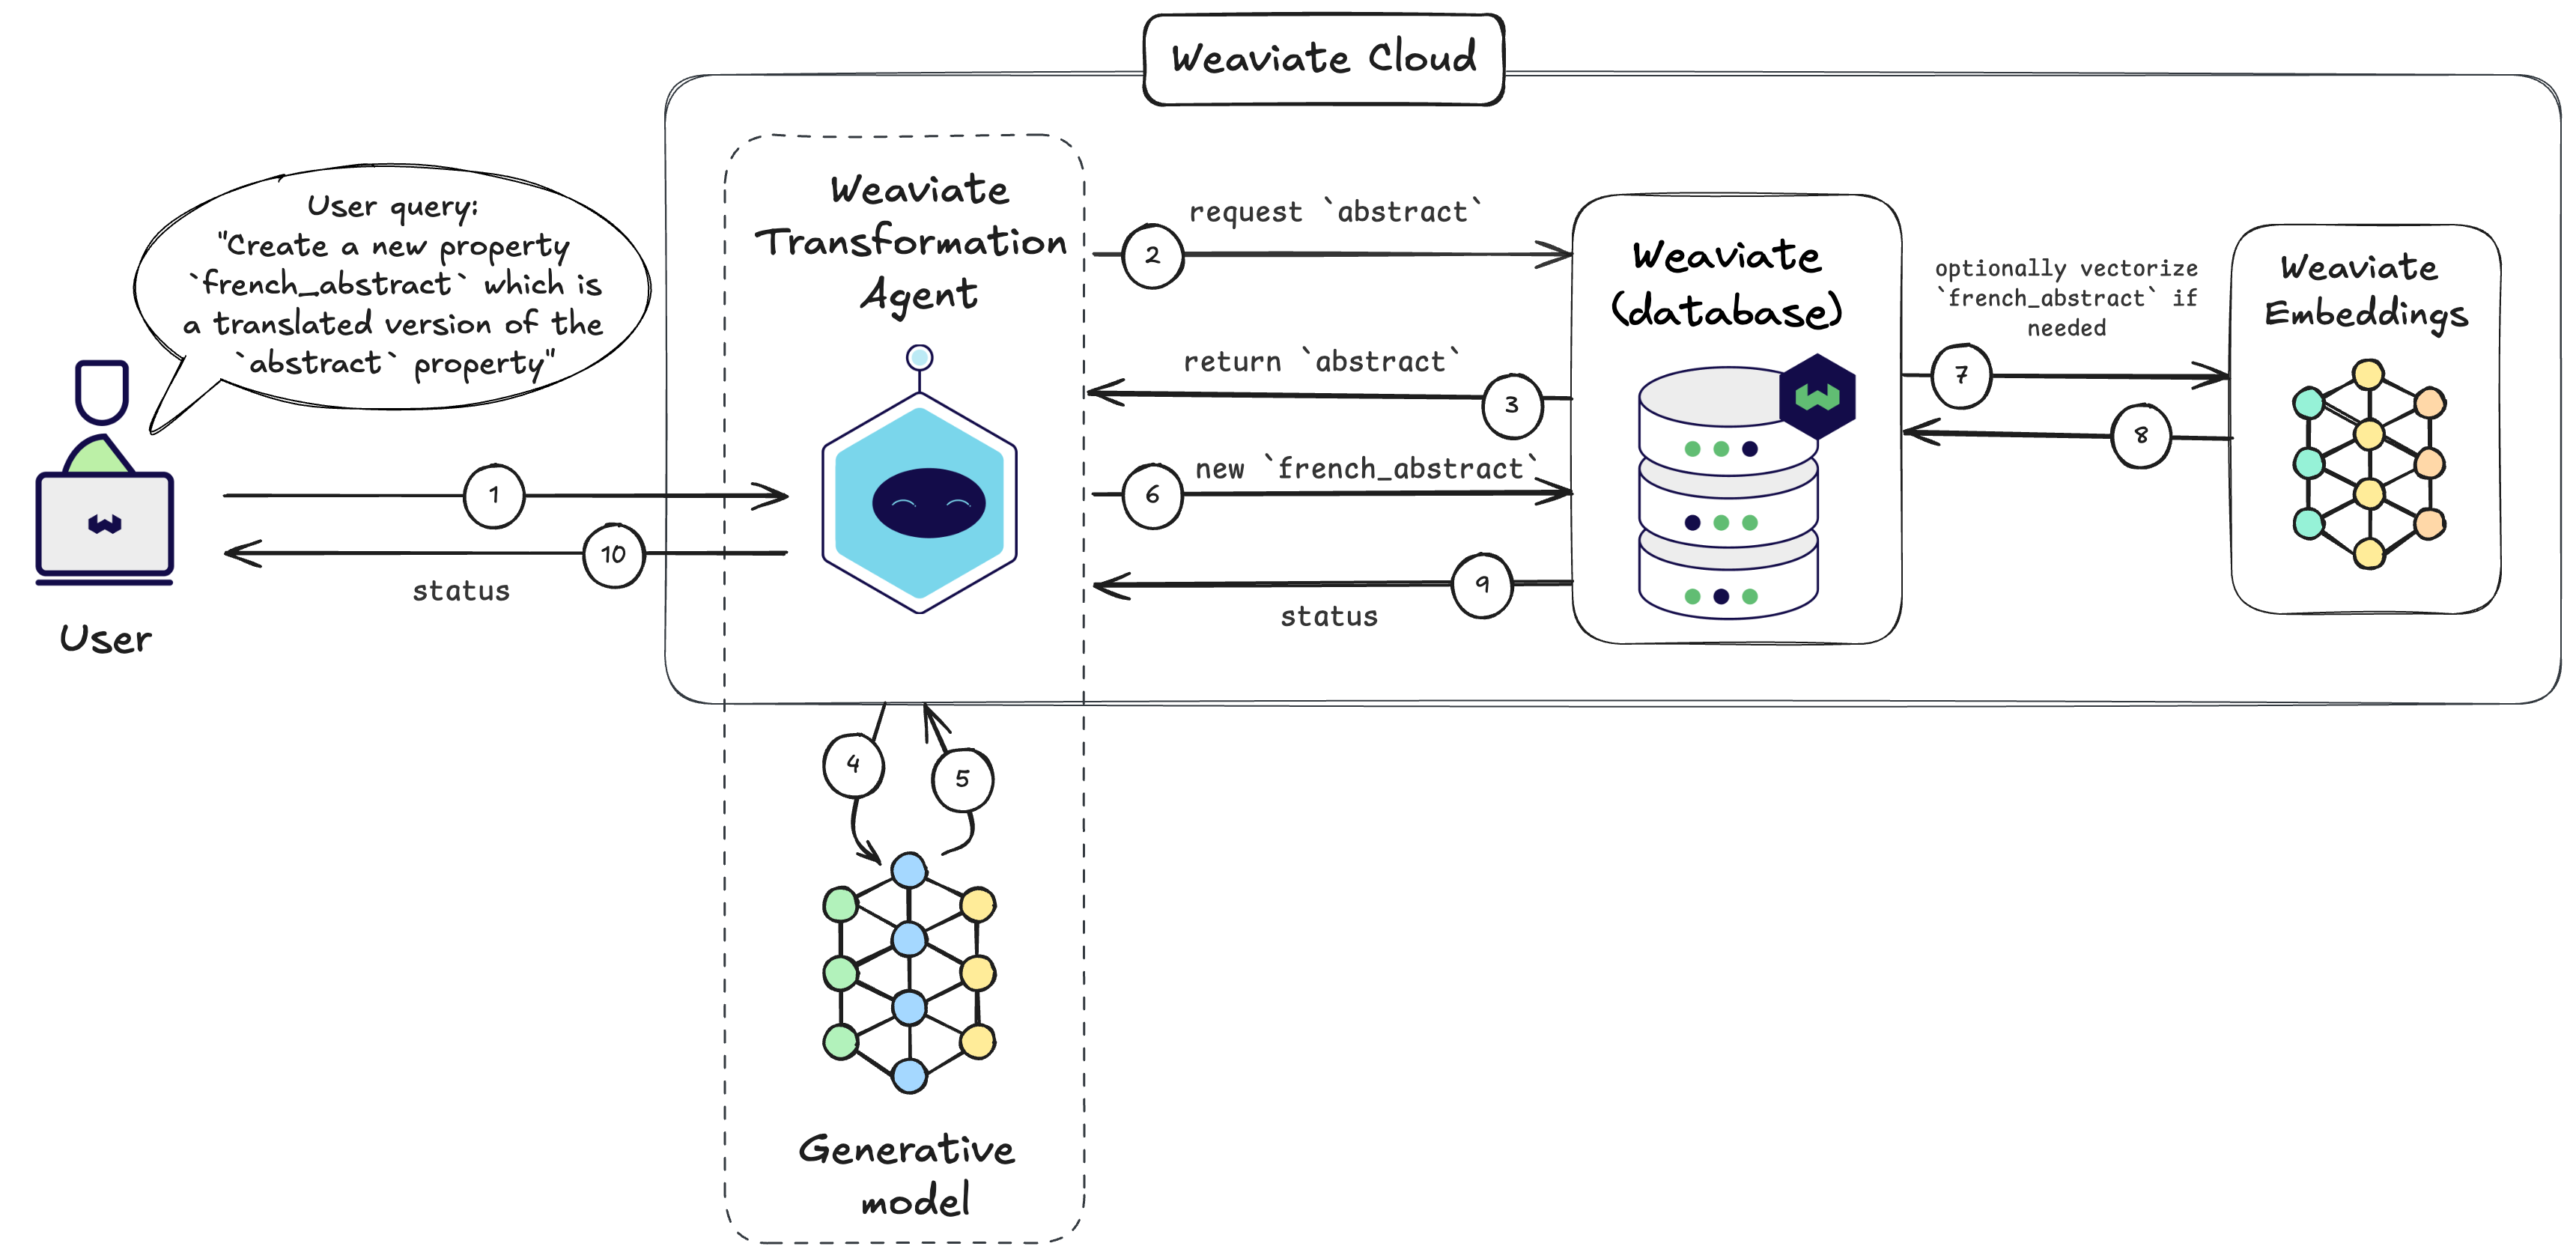
The Transformation Agent:
- Receives a task to create new properties or update existing ones.
- Retrieves the needed data from Weaviate, which will be updated or used to create the new properties.
- Uses an appropriate foundation model (e.g. large language model) to perform the transformation of the data.
- Stores the transformed data in Weaviate by creating new properties or updating existing ones.
Prerequisites
To use the Weaviate Agents and Weaviate Embedding service, you need to have a Weaviate Cloud account.
Step 1: Set up Weaviate
Now, let's get started by setting up a Weaviate Cloud instance that we will use for this tutorial and connecting it to the Python client.
1.1 Create a Weaviate Cloud cluster
- Create a free Sandbox cluster in Weaviate Cloud.
- Take note of the
REST EndpointandAdminAPI key to connect to your cluster. (for more info, check out the quickstart)
In this tutorial, we are using the Weaviate Embeddings service as the vectorizer, so you do not have to provide any extra keys for external embedding providers. Weaviate Embeddings uses the Snowflake/snowflake-arctic-embed-l-v2.0 as the default embedding model.
If you want to use another vectorizer, check out the list of supported model providers.
1.2 Install the Python libraries
In order to install the Weaviate Python client together with the agents component, run:
- Python
pip install "weaviate-client[agents]"
You will also need datasets, a lightweight library providing access to the publicly hosted datasets on HuggingFace.
- Python
pip install datasets
Troubleshooting: Force pip to install the latest version
For existing installations, even pip install -U "weaviate-client[agents]" may not upgrade weaviate-agents to the latest version. If this occurs, additionally try to explicitly upgrade the weaviate-agents package:
- Python
1.3 Connect to your instance
Now, you can finally connect to your Weaviate Cloud instance with the parameters from the first step:
- Python Client v4
import os
import time
import weaviate
from weaviate.auth import Auth

# Best practice: store your credentials in environment variables
weaviate_url = os.environ["WEAVIATE_URL"]
weaviate_api_key = os.environ["WEAVIATE_API_KEY"]

client = weaviate.connect_to_weaviate_cloud(
    cluster_url=weaviate_url,
    auth_credentials=Auth.api_key(weaviate_api_key),
)

print(client.is_ready())  # Should print: `True`

# Your work goes here!

client.close()  # Free up resources
After running this snippet, you should see the message True printed out, which means that you have successfully connected to your instance.
Step 2: Prepare the Collections
In the following code blocks, we are pulling our demo datasets from Hugging Face and writing them to new collections in our Weaviate Sandbox cluster. Before we can start importing the data into Weaviate, we need to define the collections, which means setting up the data schema and choosing the vectorizer/embedding service.
2.1 Define the Collections
In this image, you can see what the objects in the dataset ArxivPapers look like.
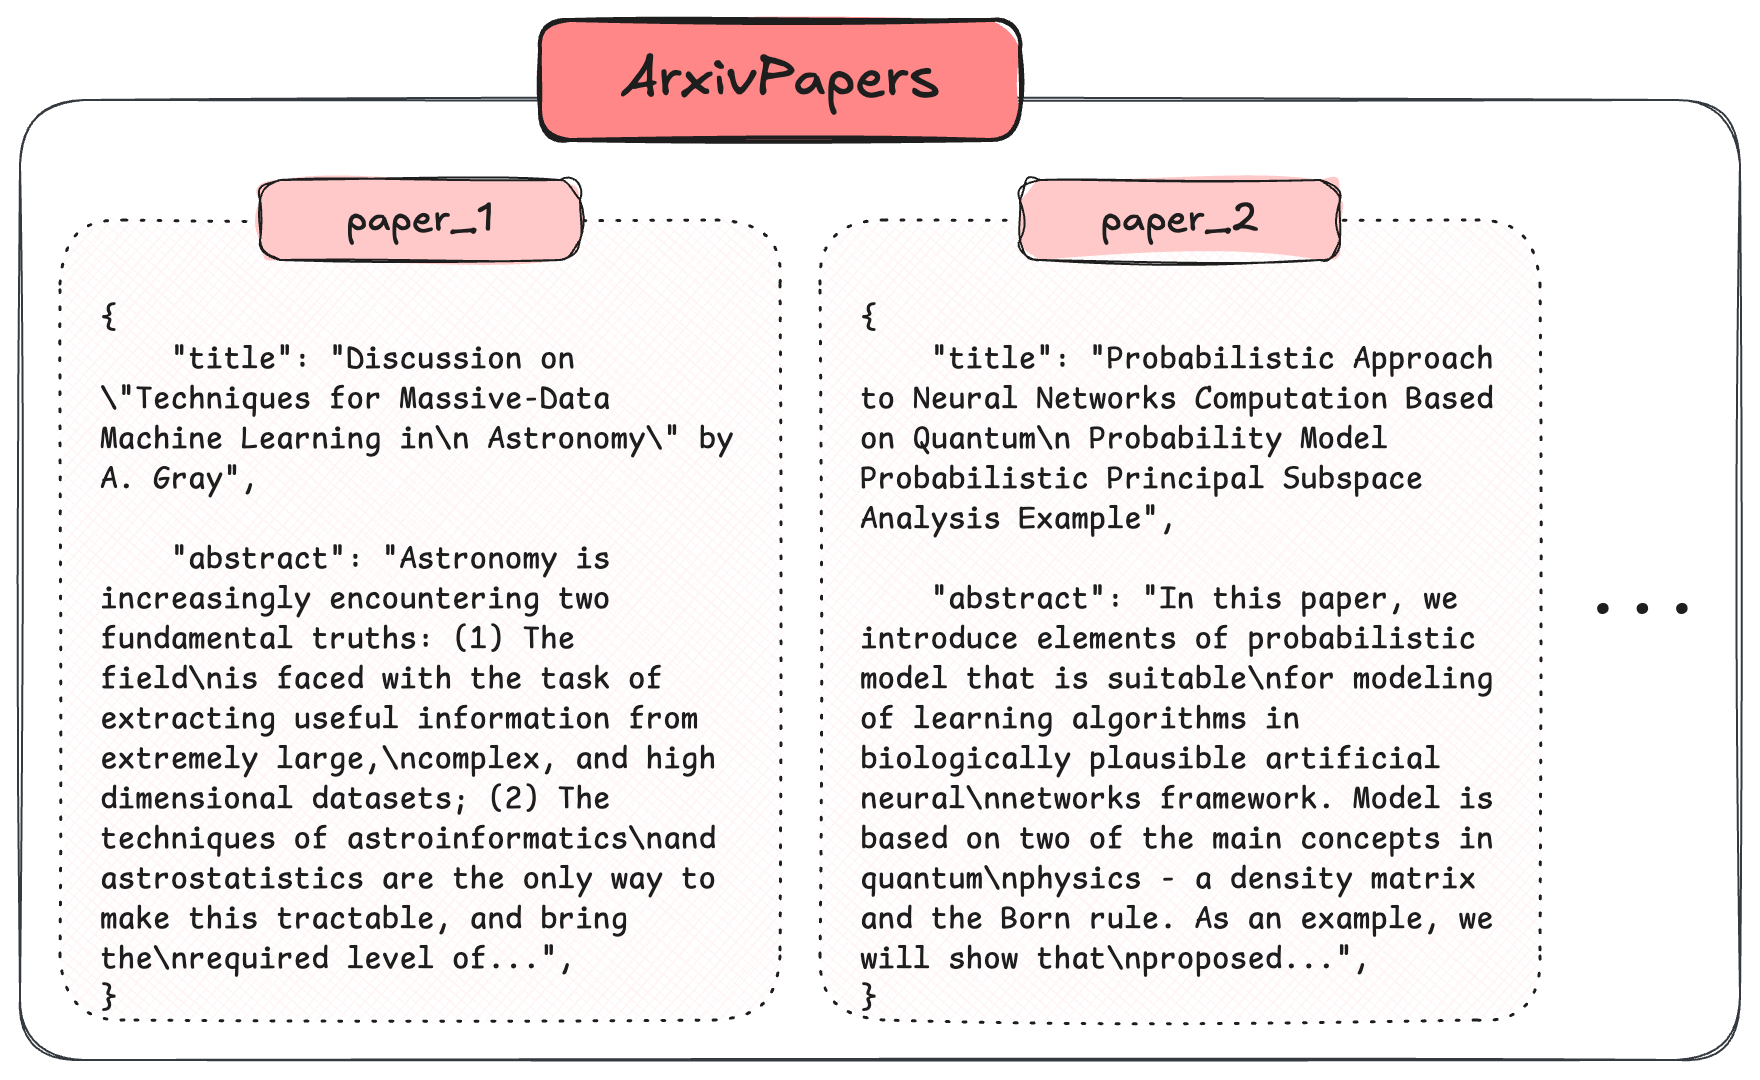
For the collection ArxivPapers, we are going to use the auto-schema option, which creates properties automatically based on the imported data.
- Python Client v4
from weaviate.classes.config import Configure

client.collections.create(
    "ArxivPapers",
    description="A dataset that lists research paper titles and abstracts",
    vectorizer_config=Configure.Vectorizer.text2vec_weaviate(),
)
2.2 Populate the database
Now, we can import the pre-vectorized data ArxivPapers into our Weaviate Cloud instance:
- Python Client v4
from datasets import load_dataset

dataset = load_dataset(
    "weaviate/agents", "transformation-agent-papers", split="train", streaming=True
)

papers_collection = client.collections.get("ArxivPapers")

with papers_collection.batch.fixed_size(batch_size=200) as batch:
    for item in dataset:
        batch.add_object(properties=item["properties"])

failed_objects = papers_collection.batch.failed_objects
if failed_objects:
    print(f"Number of failed imports: {len(failed_objects)}")
    print(f"First failed object: {failed_objects[0]}")

print(f"Size of the ArxivPapers dataset: {len(papers_collection)}")
By calling len() on our collections, we can check that the import has successfully concluded and see what the size of our collections is.
Size of the ArxivPapers dataset: 200
2.3 Inspect the collection in the Explorer tool
The Transformation Agent will modify the collection as we go along. This is a good time to take a look at the contents of your "ArxivPapers" collection. If all goes well, you should be seeing 2 properties listed for each object:
title: the title of the paper.abstract: the abstract of the paper.
As well as the vectors for each object.
Step 3: Set up the Transformation Agent
The star of the show for the Transformation Agent are the "operations".
We can now define the transformation operations that we want to perform on our collection. An operation can be:
3.1 Append new properties
To append a new property, we define an operation with:
instruction: This is where you can describe, in natural language, what you want this new property to be.property_name: The name you want the property to have.data_type: The specific datatype the property should be (DataType.TEXT,DataType.TEXT_ARRAY,DataType.BOOL,DataType.INT, etc.)view_properties: Sometimes, you may want to create properties that are based on information provided in other properties and this is where you can list out which properties the instruction should access.
3.1.1 Create a list of topics
First, let's append a new property called topics, which should be a TEXT_ARRAY. Based on the abstract, let's ask for the LLM to extract a list of topic tags. Let's ask for no more than 5.
- Python Client v4
from weaviate.agents.classes import Operations
from weaviate.collections.classes.config import DataType

add_topics = Operations.append_property(
    property_name="topics",
    data_type=DataType.TEXT_ARRAY,
    view_properties=["abstract"],
    instruction="""Create a list of topic tags based on the abstract.
    Topics should be distinct from each other. Provide a maximum of 5 topics.
    Group similar topics under one topic tag.""",
)
3.1.2 Add a French translation
Next, let's add a new french_abstract property, which is simply a translation of the abstract property:
- Python Client v4
add_french_abstract = Operations.append_property(
    property_name="french_abstract",
    data_type=DataType.TEXT,
    view_properties=["abstract"],
    instruction="Translate the abstract to French.",
)
3.1.3 Add NLP Relevance Score
This time, we can add a property that is an INT. Here, we ask the LLM to give a score from 0 to 10 based on how relevant the paper is to Natural Language Processing.
- Python Client v4
add_nlp_relevance = Operations.append_property(
    property_name="nlp_relevance",
    data_type=DataType.INT,
    view_properties=["abstract"],
    instruction="""Give a score from 0-10 based on how relevant the abstract is to Natural Language Processing.
    The scale is from 0 (not relevant at all) to 10 (very relevant).""",
)
3.1.4 Determine if it's a survey paper
Finally, let's ask for a BOOL property, which indicates whether the paper is a survey or not. The LLM will determine if the paper presents novel techniques or if it's a survey of existing ones.
- Python Client v4
add_is_survey_paper = Operations.append_property(
    property_name="is_survey_paper",
    data_type=DataType.BOOL,
    view_properties=["abstract"],
    instruction="""Determine if the paper is a "survey".
    A paper is considered a survey if it surveys existing techniques and not if it presents novel techniques.""",
)
3.2 Update an existing property
Don't perform updates on properties that are part of other agent operations. This will result in unpredictable behavior.
Now, let's update the title property as we haven't used it in any previous operations:
- Python Client v4
update_title = Operations.update_property(
    property_name="title",
    view_properties=["abstract"],
    instruction="""Insert the label MACHINE_LEARNING before the original title if the abstract mentions machine learning techniques.""",
)
Step 4: Create and run the Transformation Agent
Once we have defined all of our operations, we can initialize the TransformationAgent.
When initializing the agent, we have to let it know which collection to modify. In this case, we want it to have access to the "ArxivPapers" collection we previously created.
Next, we need to provide a list of operations that the agent should run. Here, we provide all the operations we defined above.
- Python Client v4
from weaviate.agents.transformation import TransformationAgent

agent = TransformationAgent(
    client=client,
    collection="ArxivPapers",
    operations=[
        add_topics,
        add_french_abstract,
        add_nlp_relevance,
        add_is_survey_paper,
        update_title,
    ],
)
4.1 Running the transformations
By calling update_all(), we get the agent to spin up individual workflows for each operation. Each operation will then run on each object in our collection.
- Python Client v4
response = agent.update_all()
print(response)
Now, you can open the Explorer tool to check the results of the transformation.

The output is:
[TransformationResponse(operation_name='topics', workflow_id='TransformationWorkflow-7006854bd90f949b59bb8d88c816bdd6'),
TransformationResponse(operation_name='french_abstract', workflow_id='TransformationWorkflow-7a025ef11ef8e681adb0c273755d0a2a'),
TransformationResponse(operation_name='nlp_relevance', workflow_id='TransformationWorkflow-e6db777629ae7b38ca2f8f64df35c305'),
TransformationResponse(operation_name='is_survey_paper', workflow_id='TransformationWorkflow-e70d29827271f462f2a911ec29c6cb0c'),
TransformationResponse(operation_name='title', workflow_id='TransformationWorkflow-6b2ff75370e1f80ff537037fde02cb26')]
4.2 Inspect the operation workflows
To inspect the status of the asynchronous transformation operations, we can use the agent.get_status(workflow_id) function:
- Python Client v4
print(agent.get_status(workflow_id=response.workflow_id))
The output is:
{'workflow_id': 'TransformationWorkflow-f408a4a0211940525c0e2d45cf46a6c2', 'status': {'batch_count': 1, 'end_time': None, 'start_time': '2025-03-10 13:17:31', 'state': 'running', 'total_duration': None, 'total_items': 200}}
Summary
This guide shows you how to build an end-to-end Transformation Agent using Weaviate's agentic services — from setting up your Weaviate Cloud instance and importing a research papers dataset to configuring a Transformation Agent that intelligently enriches your data.
The Transformation Agent automatically interprets natural language instructions to create or update properties in your dataset. It processes your collection by appending new properties like topic tags, translations and relevance scores, ensuring your data is enhanced and ready for further analysis.
Further resources
Questions and feedback
The official changelog for Weaviate Agents can be found here. If you have feedback, such as feature requests, bug reports or questions, please submit them here, where you will be able to see the status of your feedback and vote on others' feedback.
If you have any questions or feedback, let us know in the user forum.