
Git and GitHub guide
Introduction
Git and GitHub are indispensable tools for working with open-source communities.
So we prepared a guide on using git and GitHub to help you contribute to Weaviate. If you are relatively new to working on open-source projects, you may find this section helpful.
If you are new to git/GitHub, you can go through this section like a tutorial and follow along. Alternatively, you can treat it as a reference and jump to the relevant section. The commands shown below are shell commands.
Contributing to Weaviate using git and GitHub
There are four major GitHub repositories of Weaviate, any of which you can contribute to. This includes:
- Weaviate - Weaviate's "core" codebase
- Weaviate-io - official Weaviate documentation
- Weaviate Examples - apps built using Weaviate
- Awesome Weaviate - list of examples and tutorials on how to use Weaviate
Generally speaking, the process to contribute using git and GitHub goes like this:
- Identify the right repository to contribute to. Then:
- To report a bug or suggest an enhancement, open an issue
- To contribute to the code base or the documentation:
Here is some information on working with git and GitHub.
Git
Git is a version control tool which keeps track of the changes you make to files, allowing you to go back to previous versions if necessary and keeping a record of what has been done.
Each set of tracked files is called a "repository", or a "repo". Each repo is typically contained in a directory.
You need to install Git on your computer before you can use it. If it's already installed, updating to the most recent version is probably a good idea. Read more about installing git here.
Once you have installed git, you can run commands like git pull, git commit or git push on the command line. This mode of activity is also called the git command-line interface (CLI).
Using GitHub
GitHub is a website and cloud-based service for collaborating using git repositories.
To be clear, you do not need a GitHub account to use Weaviate. But you will need one to contribute code or documentation to open source projects hosted on GitHub, which includes Weaviate.
You can create a GitHub account here.
Git vs. GitHub
Git is a version control tool. GitHub is an online platform that serves as a remote repository for git projects.
You can just use git on your local machine, but using a remote repository such as GitHub enables efficient collaboration with other team members.
Now, let's take a look at how we can use git and GitHub to contribute to Weaviate.
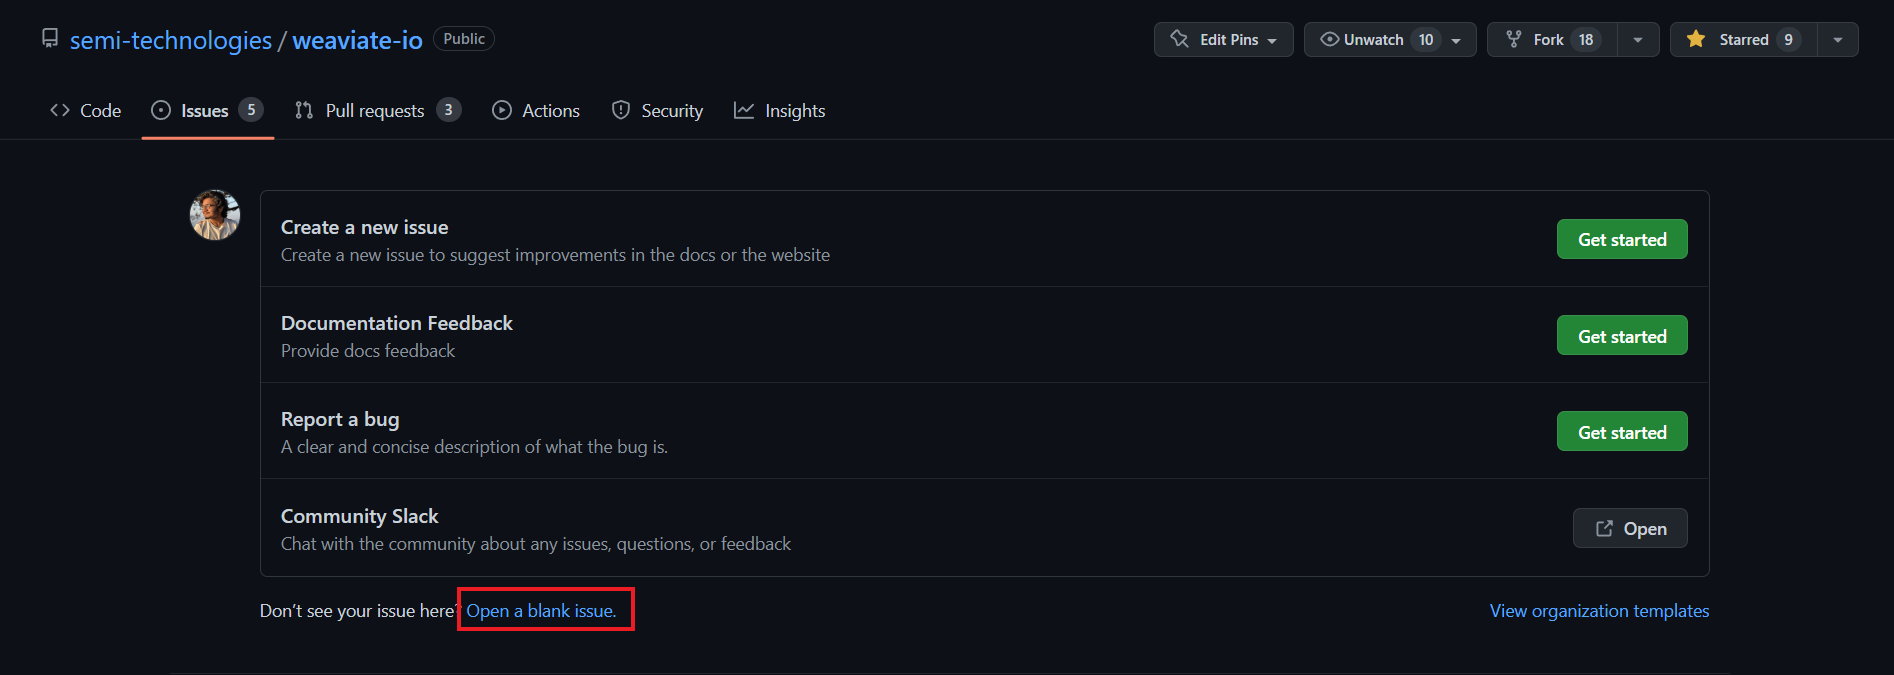
Report an issue
GitHub allows creation and tracking of "issues". These are typically used to manage bugs or feature requests. To create an "issue" on GitHub, go to the issue tab in the relevant repository, and click "New issue."

There are several templates available, such as documentation feedback, and bug reporting. If you want to create your own custom issue, go to the bottom left of the issue list box and click "Open a blank issue."
Example: Create a new issue
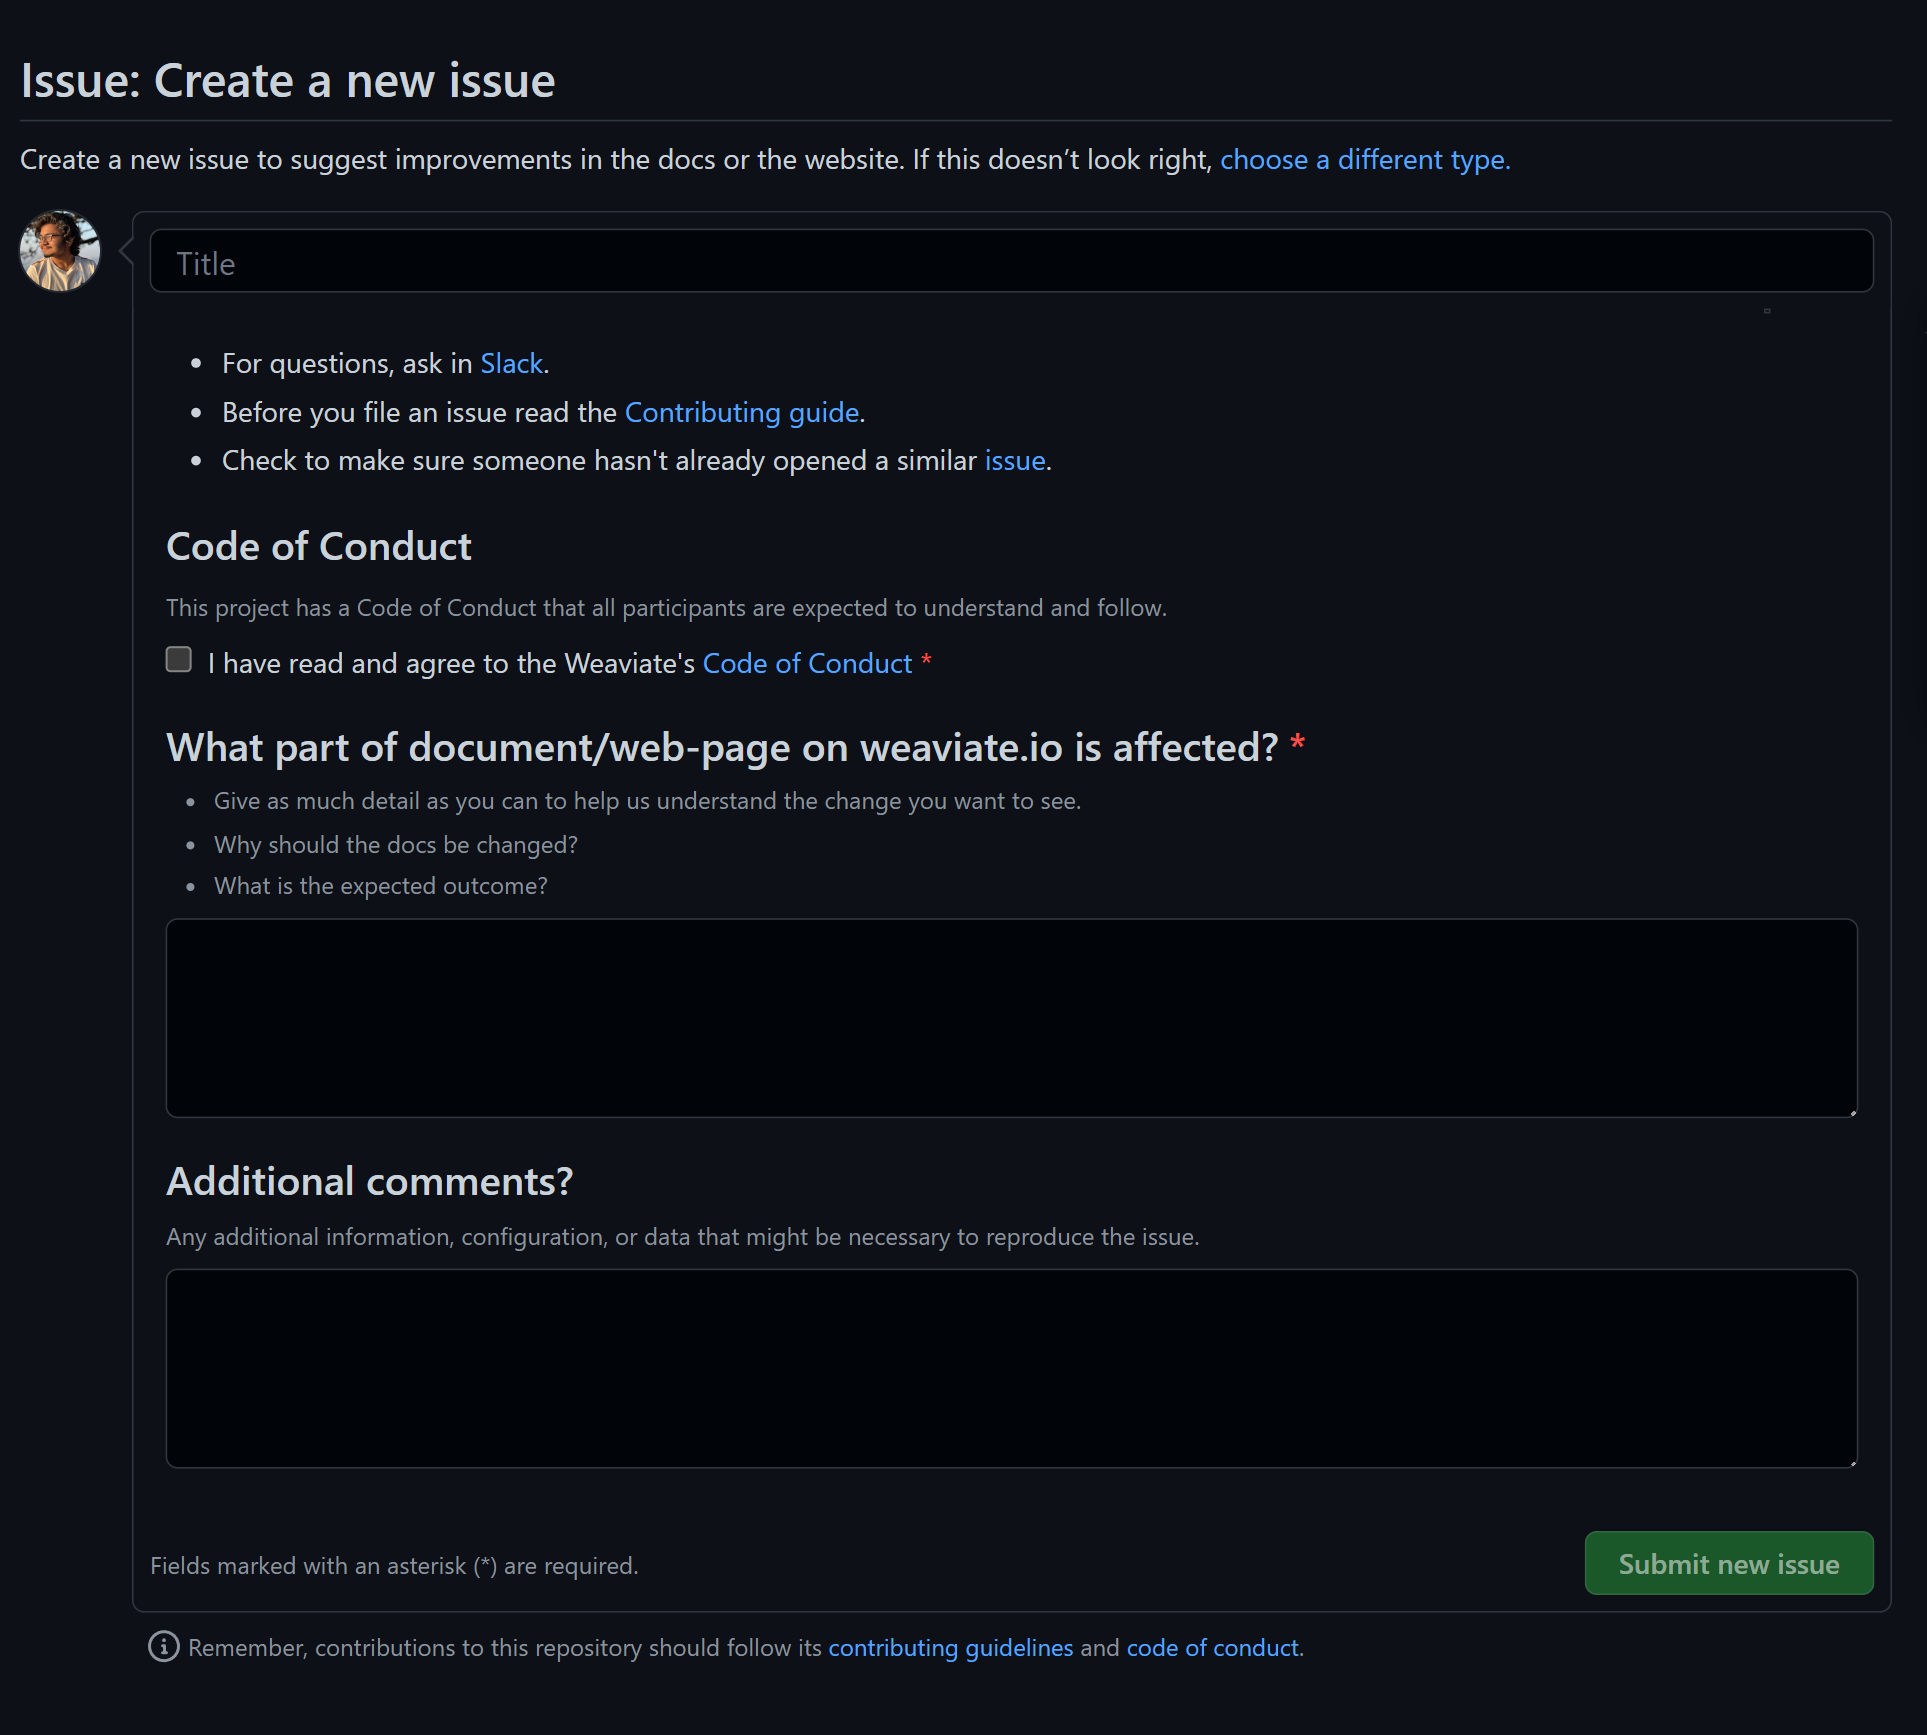
Fill out each field based on the questions and guidance provided.
Work with a fork
To work on a Weaviate repository, we recommend that you fork it first and then work on it.
A fork is your own copy of someone else's repository. Forks let you make changes to a project without affecting the original repository. You can fetch updates from or submit changes to the original repository with pull requests.
Fork the repository
- To create a fork, go to the relevant GitHub repository and click the
Forkbutton. This will create a copy of the repository (i.e. a fork) under your account.

The original repository is typically called the "upstream" repo.
Make (clone) a local copy
- Now we need to
cloneyour new repo. This will place a local copy of the repository on your machine so that you can make changes. Go to GitHub, and copy the URI of the repository.
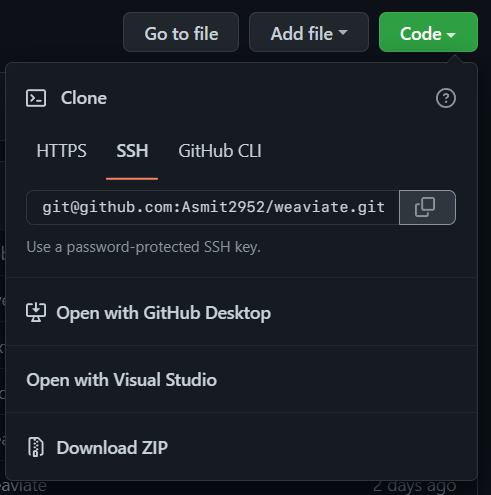
Using this URI, type into your shell:
git clone git@github.com:<USERNAME>/weaviate.git
Where git@github.com:<USERNAME>/weaviate.git is the URI you copied.
Note: ("weaviate" is used as the example repo. Make sure to cite the particular repository you are contributing to (for example, "weaviate-io")
After cloning the repository from GitHub, use the change directory command to navigate to the cloned folder.
cd weaviate
Now you have a complete local copy of the repository! Here are some tips now on how to go about making changes to the repository, so that you can (hopefully) get them incorporated.
Create a new branch to work on
Do not change files on a main branch, even if it is on your fork.
It's best practice to create a new branch for each set of changes such as a new feature or bugfix. The reason is that it isolates each set of changes from the main branch so that each Pull Request can also be evaluated and managed independently.
Create a new branch with a simple informative name. For example:
- For enhancements use
feature/issue#orfeature/nameOfFeature - For bugs use
bug/issue#orbug/nameOfBug
To work with a new branch you can run either
git branch feature/newPage      #create a new branch
git checkout feature/newPage    #checkout on created branch
Or
git checkout -b feature/newPage
Note:
checkoutwill switch to the newly created branch.-bwill create a new branch if the branch doesn't already exist
This will create a new branch and move to it. Now, start hacking away and making any modifications you want.
Check git status
After you've fixed the issue and tested it (Tests are critical! Never submit a change that hasn't been tested), you can keep track of your progress using this command:
git status
This will show you which files are currently being modified and which branch you're working on.
Create a Pull Request
A few considerations must be made before submitting a Pull Request. Your Pull Request will be merged more quickly if your branch is cleaned up.
If any commits to the upstream <default> branch have been made during the period you've been working on your changes, you will need to rebase your development branch so that merging it will be a fast-forward process without requiring any effort on conflict resolution.
Fetch the upstream main branch and update your local repository by following these steps on how to incorporate upstream changes.
Rebase your development branch if there were any new commits
git checkout feature/newPage
git rebase <default>
Pull Request process
A "Pull Request" (PR), as the name suggests, requests that another party pull your changes to their repository. In this case, you creating a PR means requesting that someone managing the Weaviate repo pull in changes from your fork. If successful, your changes will become a part of the upstream repository!
Here are some general guidelines about how to submit a Pull Request:
If you're making visual changes, include a screenshot of the affected element before and after
Update the documentation if you change any user-facing functionality in Weaviate
Each Pull Request should implement one new feature or fix one bug. Submit multiple Pull Requests if you want to add or fix multiple items.
Do not commit changes to files that are irrelevant to your feature or bug fix
Write a good commit message. Check out commit guidelines
Adding the files and committing:
First, make sure you are on your development branch.
In git, files need to be 'staged' before being added to a commit. Prior to adding files to the staging area, always validate visually which files need to be staged. Check the tracked modifications in the git repository like so:
git status
From here, you can add relevant files to the staging area. You can do so based on their filename:
git add filename
You can also use git add . to stage all modified files in the current directory as well as subdirectories. But use this with care, as doing so might add irrelevant files, such as local configuration files for temporary files.
To systematically ignore certain files or directories, you can create a .gitignore file.
You can run git status as many times as necessary to check what has been staged. You can also unstage files as necessary.
- If everything is good to go, proceed with committing your changes. Try to add a concise and informative commit message - your future self and others will thank you for it. Read more about commit guidelines here.
git commit -m "your commit message"
Pushing the commit:
- To have your GitHub repo reflect changes made to your local repo, push to the remote repo:
git push origin feature/newPage
If asked, enter your GitHub login credentials. When complete, all local commits will be on your GitHub repository.
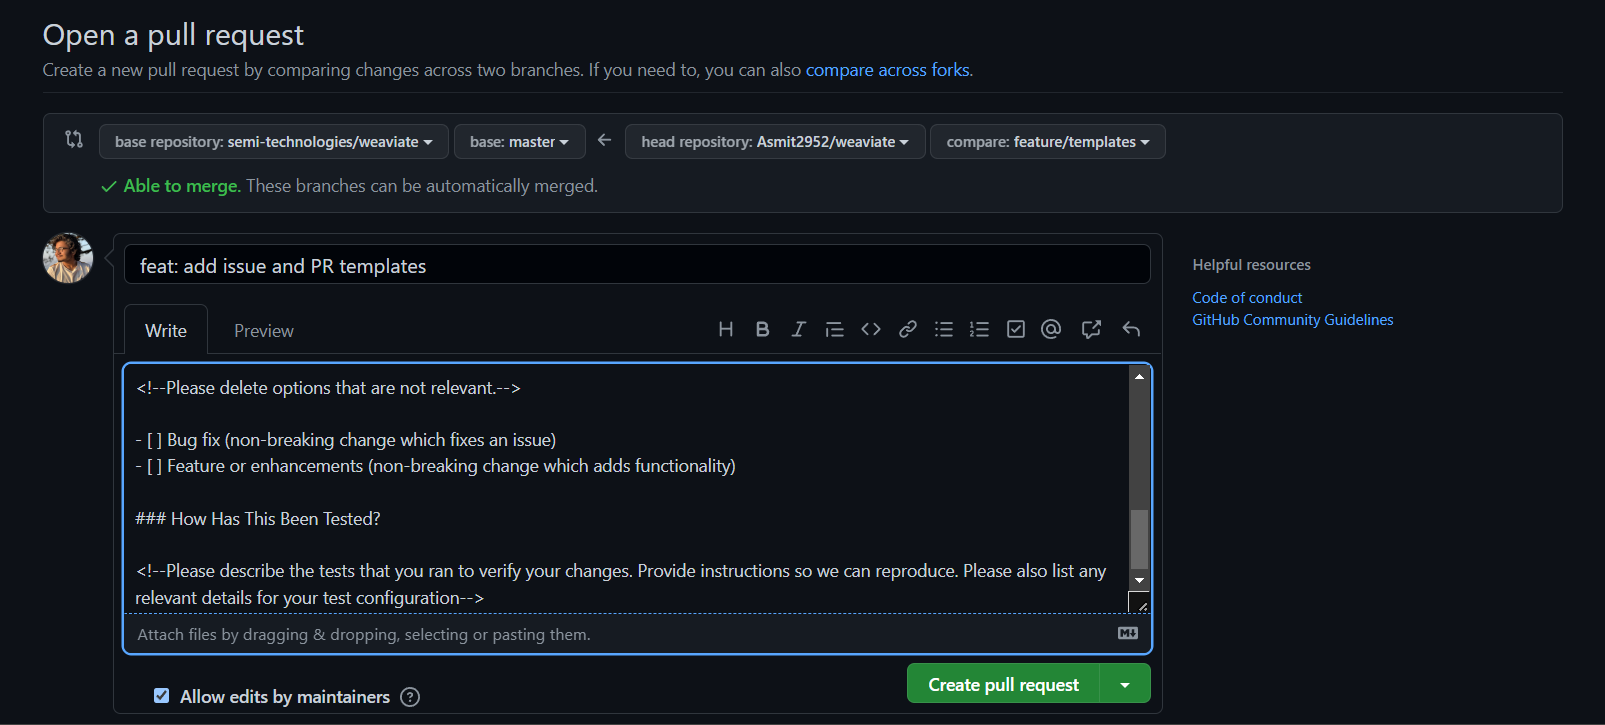
When all of your changes have been committed and pushed to GitHub, visit the page for your fork there, choose the development branch, and then press the Compare & Pull Request button.

If you need to make any further commits to your Pull Request, simply check out your development branch and push the updates to GitHub. Your Pull Request will automatically keep track of and update the commits made to your development branch.
- Complete the Pull Request by filling out our Pull Request template
- Once your changes are ready, make sure you self review your Pull Request to speed up the review process.
Self reviewing Pull Requests
You should always review your own Pull Request first.
For any changes you commit, make sure that you:
Confirm that the changes meet the objectives of the issue you created or are working on.
Compare your Pull Request's source changes to staging to ensure that the output matches the source and that everything is rendering as expected. This assists in detecting issues such as typos or content that isn't rendering due to versioning issues.
If there are failing checks in your PR, try to resolve them. If you get stuck, you can ask for help on the community forum or Slack.
Documentation-specific guidelines
Check for technical accuracy in the content. You can always ask for help if you get stuck.
Verify that the syntax of new or updated MDX or React statements is proper.
After submitting a Pull Request
After you've created the Pull Request, there are two possibilities:
Your PR will be accepted, and your commit will be merged into the
<default>branch, congratulations!Your PR will require further attention. This may happen due to:
- Irrelevant or breaking changes
- Reviewer wants something changed
Working with git and GitHub can be intimidating at first, but it is a core part of how the open-source community works together to create such amazing tools. If you have any further questions, you can reach out to us also.
We include some additional tips below.
Additional git / GitHub tips
How to incorporate upstream changes
A fork separates a repository from its upstream equivalent. So, you will need to pull upstream changes from time to time to keep your fork up to date with changes made upstream.
To do this, first track the upstream repo by adding a remote upstream URL to the local repository.
git remote add upstream https://github.com/weaviate/weaviate.git
- To check if your local copy properly references the upstream repository on GitHub, run the command below
git remote -v
You should see:
origin    https://github.com/Your_Username/weaviate.git (fetch)
origin    https://github.com/Your_Username/weaviate.git (push)
upstream  https://github.com/weaviate/weaviate.git (fetch)
upstream  https://github.com/weaviate/weaviate.git (push)
To bring in upstream changes to your fork, you need to fetch and pull the upstream repo's branches and commits. Here are two ways that you can do this:
Fetch upstream with GitHub and git CLI
The first step is to incorporate any upstream changes to your forked repository. Head over to the forked GitHub repository, and under
Fetch Upstream, clickFetch and merge.The next step is to bring those changes to the local repository. If you have made any changes, make sure to commit them locally. Then check out the
main(ormasterfor Weaviate) branch like so:
git checkout main
Note, the
weaviateproject usesmasteras its default branch, whileweaviate-iousesmain. Pick the right branch name based on the project you use.
- Then pull the changes into local repository
git pull origin main
This will update your local repository to reflect your remote, forked repository.
Fetch upstream with git CLI
Or you can just use the git CLI as below:
- Check out the
mainbranch first
git checkout main
- Fetch the upstream changes
git fetch upstream
- Then pull any changes from the upstream
mainbranch into the current local branch (i.e.main- checked out earlier)
git pull upstream main
- Last, push to your own remote repository (named
origin) to keep the forked GitHub repo in sync
git push origin main
One liner script for super users:
git remote add upstream https://github.com/weaviate/weaviate.git || true && git fetch upstream && git checkout main && git pull upstream main && git push origin main
View all branches including remote branches
git branch -a
Additional resources
To learn more about git and GitHub, see:
- GitHub Skills is a learning program provided by GitHub that teaches git and GitHub fundamentals.
- Pro Git Book is a comprehensive reference book on git.